, - Posted by Tommy Segoro
INTRODUCTION
You probably have read my post on configuring SQL Clustering for SharePoint. Now I need to also configure SQL Reporting Service to be highly available (HA). In Reporting Service term this is called Scale-Out Deployment.
For this exercise I have 2 SQL Servers cluster namely SQL01 and SQL02. The cluster node is called SQLCL. Please note that in my case, all of these servers are under the same domain Active Directory.
This post is also related to How to Install Microsoft Dynamics CRM Reporting Extension SSRS in SQL Report Cluster Scale-Out Deployment.
STEP-BY-STEP INSTRUCTIONS
1. Upon installing SQL Cluster for your main node (eg. SQL01) you may have selected SQL Reporting Service as one of the SQL features you decide to turn on. If this is the case then simply follow the next step. Otherwise, you will have to run the wizard again. Should you decide to run the wizard again please be mindful that reporting service can only be installed using the “Standalone Installation“. Therefore, when you re-run the wizard, select Installation > New SQL Server stand-alone installation or add features to an existing installation.
Now, very important thing. To re-run the wizard you need to use command prompt rather than double-clicking setup.exe. The reason is because you will encounter the error below during rule validation:
StandaloneInstall_HasClusteredOrPreparedInstanceCheck Checks if the selected instance name is already used by an existing cluster-prepared or clustered instance on any cluster node. Failed – The instance selected for installation is already installed and clustered on computer <name>. To continue, select a different instance to cluster
Therefore, to avoid this problem we need to make sure that that particular rule validation is not run during install. To do this, on command prompt run the following:
C:\Downloads\SQLInstallFolder\Setup.exe /SkipRules=StandaloneInstall_HasClusteredOrPreparedInstanceCheck /Action=Install
Then, the wizard will start and make sure you select Installation > New SQL Server stand-alone installation or add features to an existing installation. Then select Add features to an existing instance of SQL Server 2012 then simply select the existing SQL cluster instance and click Next.
Upon Feature Selection select the Reporting Service – Native then Next.
On Server Configuration specify the service account to run the Report service. I suggest use an Active Directory account and make sure it’s the same for all of the cluster nodes.
On Reporting Services Configuration select Install Only.
2. Do the same installation steps for SQL02.
3. Now it’s time to configure the Report Service cluster. Go to SQL01 and run Reporting Service Configuration Manager.
– Click on Web Service URL and click Apply. This will give you URL something like http://sql01:80/ReportServer.
– Click on Report Manager URL and click Apply. This will give you URL something like http://sql01:80/Reports.
– Click on Database and select Change Database. On the Change Database wizard select Create a new report server database. On Database Server make sure you specify the cluster instance ie. SQLCL. Then specify the database name, in my case it’s ReportServer and the Temp Database name is automatically set to ReportServerTemp. Specify the credentials then continue to finish off the wizard. I suggest that you use a proper domain service account eg. DOMAIN\sqlreport. In fact, use the same account as the one you specified during install previously.
– Click on Encryption Keys and Backup. This will create you a *.snk file. Have the *.snk file handy. We will need to transfer it to SQL02 later on for completing the process.
4. Now go to SQL02 and run Reporting Service Configuration Manager.
– Click on Web Service URL and click Apply. This will give you URL something like http://sql02:80/ReportServer.
– Click on Report Manager URL and click Apply. This will give you URL something like http://sql02:80/Reports.
– Click on Database and select Change Database. On the Change Database wizard select Choose an existing report server database. Select the ReportServer database you’ve created previously on step 3. Make sure you also use the same service account which in this case is DOMAIN\sqlreport.
– Click on Encryption Keys and click Restore. Now you want to use the *.snk file from step 3! Very important or else your second server will not be recognisable.
5. Then go back to SQL01 > Reporting Service Configuration Manager.
– Click on Scale-out Deployment and you will see SQL02 displayed in there with status “Waiting to join”.
– Simply select the SQL02 server and click Add Server.
That’s it!
Now instead of going to an individual server to access the reports ie. http://sql01/reportserver, you can go to your cluster node name http://sqlcl/reportserver.
You now have High Availability for your SQL Reporting Service.
Hope this helps,
Tommy
, - Posted by Tommy Segoro
INTRODUCTION
I have just configured SQL Server Reporting “cluster” or in SQL Server term: “Scale Out Deployment”. What this allows me to do is to achieve High Availability (HA) for the reports ie. when one report server is down, the other node can serve the reports.
I then install MS CRM to use this clustered report service. For this example I have 2 SQL servers namely SQL01 and SQL02 – and each has reporting service (SSRS) installed – and the cluster node name is SQLCL. Therefore, my report server cluster URL is http://sqlcl/reportserver.
Installing CRM to use this cluster is easy; simply specify the URL above as the report URL in the CRM installation wizard.
What’s a bit tricky is when it comes to installing the MS CRM Reporting Extension component. I thought it would be as easy as running the wizard twice, once on each of the SQL node. When I run it on SQL01 or SQL02 I got the following warning message:
Reports will not be published for some organizations because the Report Server instances used by these organizations differ from the instance selected during Microsoft Dynamics CRM Reporting Extensions Setup
What that means is, no reports will be deployed in CRM. If you go to CRM > Reports, none of the reports will appear in there.
RESOLUTION
Therefore, to resolve it please follow the following steps:
1. Go to SQL01 and install MS CRM Reporting Extension. It will give you the warning above but will not prohibit you from progressing with the install.
2. Go to SQL02 and install MS CRM Reporting Extension. It will give you the warning above but will not prohibit you from progressing with the install.
3. Go to CRM server > Deployment Manager then Disable the organisation.
4. Select the disabled organization then select Edit Organisation.

5. Update the Report Server URL with the report server URL of the first node (eg. http://sql01/reportserver). Click Next and let CRM updates the organisation.
6. Go to SQL Management Studio then open MSCRM_CONFIG table. Make sure AreReportsPublished is False!
7. Then go to SQL01 and uninstall MS CRM Reporting Extension.
8. Then still at SQL01 and reinstall MS CRM Reporting Extension. On the confirmation screen you will no longer get the warning message. Proceed until completion.
9. Repeat 4-9 but this time use SQL02.
10. Finally back at the CRM > Deployment Manager, Edit Organisation again and update the Report Server URL back to the cluster URL http://sqlcl/reportserver.
11. Enable the organisation and that’s it!
This resolution is applicable for both MS CRM 2011 and 2013.
Hope this helps,
Tommy
, - Posted by Tommy Segoro
INTRODUCTION
I have a task of moving documents out of a folder to another folder. I figure that the quickest way of doing this is by using the Windows Explorer feature in SharePoint. The button is available from the “Library” tab within a document library. Unfortunately this button is disabled when I opened that tab.
RESOLUTION
After some investigations I found the following:
1. Make sure Office Web Client is installed. This is available from your Office installation CD/media.
2. Make sure WebClient service is started. Go to services.msc or Administrative Tools > Services.

3. Make sure you use 32-bit Internet Explorer and NOT 64 bit!
Hope this helps,
Tommy
, - Posted by Tommy Segoro
INTRODUCTION
I have updated a user’s details in Active Directory (in this instance surname and email). I re-run the User Profile sync service and all is well. When I check the User Profile in User Profile Service Application the details are all updated correctly.
When the user login to SharePoint however, the “Welcome” text still says the old surname. When he clicks “My Settings”, that page is still displaying old details.
RESOLUTION
After some reading and investigation I realise that SharePoint uses a separate database from User Profile Service. When the User Profile Service is updated, it’s unnecesarily that the SP user database is updated.
Therefore, the solution to this is to explicitly tell SharePoint to update and sync the user database. To do this:
1. Run:
stsadm -o sync -listolddatabases <n> ==> n stands for the number of days.
stsadm -o sync -listolddatabases 0 ==> Set it to “0” will make it to list all content databases from all sites in your SP farm.
This will display the list of web applications and the date of which the SP user list is last synched with the User Profile Service application.
In my case there are 2 sites which last sync was completed 2 weeks ago which was prior to the updated user profile (hence why in those 2 SP webs the logon welcome text is incorrect).
2. Then I force delete these “old” databases by running:
stsadm -o sync -deleteolddatabases 30 ==> Again the “30” denotes the number of days.
Don’t worry this command will NOT delete anything other than removing the “cache” for those specific SP user databases. No physical database is detached nor removed from SQL.
3. After that I force run the sync process:
stsadm -o sync
4. As a final check, run the following again:
stsadm -o sync -listolddatabases 0
You should see an updated list with the date of when you run the force sync command (ie. today). Then, your users should be updated correctly.
LAST RESORT RESOLUTION
When the above process failed then run the following through Powershell:
$web = Get-SPWeb http://intranet
$web|Set-SPUser -identity “TFS\tsegoro <ie. the updated account>” -SyncFromAD
That’s it. The above command will explicitly update the details for that particular user account.
Hope this helps,
Tommy
, - Posted by Tommy Segoro
INTRODUCTION
I’m in the process of migrating a SharePoint 2010 site to 2013. Within the site are several InfoPath forms that need to also be migrated to 2013. The migration was all easy except when I start filling the InfoPath form, I get an error querying the web service.
After some investigations I found out that the error was regarding a call to /_vti_bin/userprofileservice.asmx on GetUserProfileServiceByName method. The form uses this web service to retrieve current user information and also when retrieving manager’s information.
After fiddling around and looking at different articles online there are 2 steps in fixing this issue. Details are as follows.
NOTE: Article audience: medium to advanced users.
STEP 1. SECURE STORE SERVICE
First error I was getting was when I open the form, the web service kicks in to retrieve current user information. The error was 500 Internal Server Error Access Denied. To fix this follow these steps:
– Open InfoPath and modify your template and ensure that your Data Connection for the web service call is already converted to “relative to Site Collection”.
– Go to Central Admin -> General Application Settings -> Configure InfoPath Form Services. Then set the following:
*
– Then go to Central Admin -> General Application Settings -> Configure InfoPath Forms Services Web Service Proxy, then select the web application which you have your forms on and ENABLE BOTH tickboxes.
* Enable InfoPath Forms Services Web service proxy: YES
* Enable InfoPath Forms Services Web service proxy for user forms: YES
– Provision Secure Store Service, then create a new application.
– Set:
* Target Application ID: InfoPathForm
* Display Name: InfoPathForm
* Contact E-Mail: Your email eg. admin@admin.com
* Target Application Type: Group, then select None
* Click Next
– Leave everything as is on the next screen and click Next
– On the next screen set the following:
* Target Application Administrators: Farm account
* Members: This is basically the users who need to have access to the web service. In my case it’s NT AUTHORITY\Authenticated Users (ie. all domain users)
– Once you’ve done that a Secure Store Service application is created. Now, as you mouse over on it, a drop-down appears, select Set Credentials. Then set the account that has access to the web service. I just simply use Farm Account for simplicity. See below:
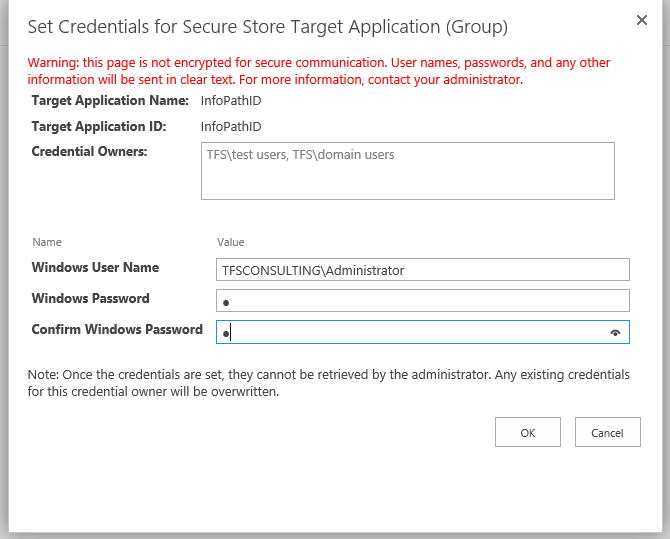
– Next step is to modify your UDCX file for the web service call located in the Data Connection Library. I named mine GetUserProfileService.udcx. As you open the file, the following line is commented out:
<udc:Authentication><udc:SSO AppId=”InfoPathForm” CredentialType=”NTLM” /></udc:Authentication>
Un-comment that line then in the AppId specify the ApplicationID you specified in Secure Store Service. In this example is InfoPathForm. Then set CredentialType to NTLM.
Then where it says UseFormsServiceProxy=”false” change it to UseFormsServiceProxy=”true”
– Upload the UDCX back to Data Connection Library.
– Go to IIS -> Your SharePoint web application -> Authentication. Make sure the following is disabled: Anonymous Authentication.
That’s it! You will not get any more authentication errors.
STEP 2. ACCESSING USER’S PROFILE DETAILS
Now, this step is optional. This is only relevant if you have a people picker control in the form, and as you select a user, you automatically access his/her profile such as email, work phone, etc.
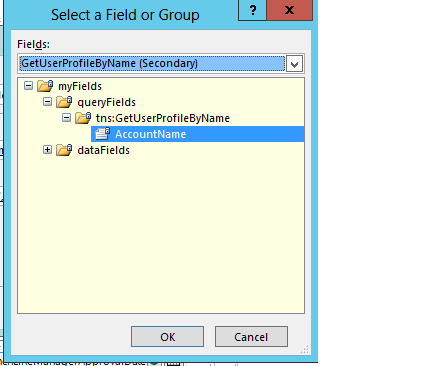
I’m not going to detail on how to make it happen but assuming that you have already had a people picker control and a hidden textbox to parse the username, you need to do the following:
In SharePoint 2007 and 2010, you can simply pass in someone’s username without the domain to the GetUserProfileByName. For example, if I pass in “tommy” instead of “DOMAIN\tommy”, it will work. In 2013 this will NOT work. The error message was:
Message: The remote server returned an error: (500) Internal Server Error. A user with the account name tommy could not be found.
In 2013 you HAVE TO pass in the domain. “tommy” will not work but “DOMAIN\tommy” will! Therefore, I have done the following:
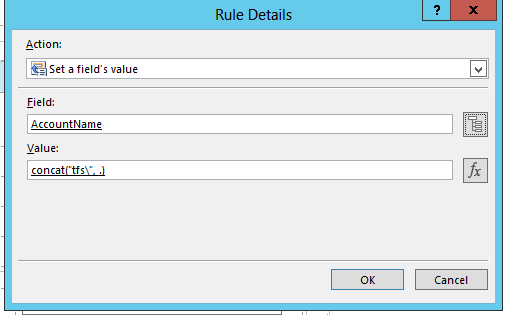
See above I append my domain ie. “TFS\”. This is bad because it’s hardcoded. You can obviously do something fancy such as storing it in a SharePoint list then retrieve it in your form, etc.
I hope this helps everyone.
Happy InfoPathing,
Tommy
We provides you the best Services in our themes.
Click on the link below to see a full list of clients which we have developed solutions and provided consultancy for.
We are solution-centered and not application-centered.
Being creative and having fun and yet still delivering a fantastic service is the center of our values.
TFS Consulting Services guarantees delivery that is within budget and deadline or you engage us for free.

Implementing IT solution does not have to be difficult. TFS Consulting Services has a lot of resources on planning and methodologies that will ensure successful delivery of your IT solution. TFS Consulting Services has been around in the web industry for more than 10 years and has experienced all the successes and failures of various type of IT deployment.

Do you need a technical resource? TFS Consulting Services can also provide you with technical resource for developing ASP.NET (C# and VB.NET), SharePoint (2003, 2007, 2010, 2013) and MS CRM applications. Our resource is an Microsoft Certified Personnel (MVP) and Microsoft Certified Technology Specialist (MCTS) in all ASP.NET, SharePoint and CRM.

Make sure your IT implementation is robust and scalable. TFS Consulting Services can provide consulting and advice on industry’s best practice on various web-related areas such as website security, design and usability, application-specific (such as SharePoint)’s best practice, Search Engine Optimisation (SEO), coding standards and many others.

Finally TFS Consulting Services provides you with solution development service. We mainly work with Microsoft technologies (ie. .NET and SQL Server), however we are also capable of developing with PHP and MySQL. If you ever need any business process automation, integration and solution development work, we are the trusted expert you should go to.
For more detailed service offerings please visit our Solutions page.
Tommy Segoro
tommy@tfsconsulting.com.au
+61 404 457 754
© TFS Consulting Services 2026. All rights reserved.