, - Posted by Tommy Segoro
INTRODUCTION
One of my clients is running WordPress for their website. And they are actually willing to utilise Cloud infrastructure to host their website (ps: some clients do not want to go to Cloud due to potential privacy breach). When we’re talking about hosting in the cloud Cloud, at the end of the day, we’re still hosting a website in “someone else’s computer” (so-to-speak). The difference is just, Cloud companies like Amazon, Microsoft or Google have the budget to provision a highly-scalable and reliable data centre. While shared hosting service, especially the small ones, often exists in the form of a reseller account or an individually-provisioned server, meaning when the server is gone, most likely all the data and websites hosted in that server will be gone, too (unless of course, the hosting company decides to provision redundant servers, etc which cost a lot of money).
To this day, shared hosting service is still popular. And I must admit, the cost is also a lot lower compared to going with Amazon AWS, Microsoft Azure or Google. The difference is just, with these giant Cloud companies, you can easily configure an auto-scaling architecture which will assist greatly in promoting 100% uptime for your client’s website. While with shared hosting service, you’re just provisioned with a control panel access like Plesk or WHM or CPanel which won’t support upscaling, etc.
Long story short, I suggested the client to go with AWS and they agreed. In this article I would like to share with you the architecture I provisioned in AWS to allow auto-scale which will promote 100% uptime of my client’s website. 100% means, unless AWS goes down, or the website gets hacked, it will be up and running at all times regardless of load.
Please note that there are “a thousand ways to go to Rome”, meaning, there are many ways to achieve the same thing. And this article just happens to demonstrate my way of doing it.
COST
Cost is always a factor especially with smaller clients like mine. Therefore, I try to be mindful of the amount of servers and services that will be created as part of the architecture (knowing that Cloud companies always charge by the number of “online” hours the provisioned resources are using).
THE JARGON
EC2 = this is a VM where your website will be hosted. It runs Apache, etc.
RDS = this is your database server.
Elastic Beanstalk = a layer above EC2 which when configured, will auto-create and destroy EC2 instances.
CloudFront CDN = geo-redundant resource distribution mechanism. It allows your users to load resources eg. images and files from the AWS server(s) closest to them.
S3 buckets = where your images and files are actually stored.
ARCHITECTURE
The architecture of choice is as follows:
For example, at 1PM you deployed Elastic Beanstalk template v1.0. EB then creates EC2 instance(s) based on v1.0. Along the way, you uploaded some images and files to the currently running EC2. Suddenly, there was a surge in user load and EB decided to spawn a new instance. This new instance will be deployed based on v1.0 template ie. without the uploaded images and files. Therefore, if the Load Balancer suddenly decides to direct traffic to the new instance, your users will see broken images and files. This is why it’s very important to use EFS.
As you can see above, this architecture is highly scalable because we’ve covered every potential avenue where it could be down. For example, if an EC2 instance is running out of RAM, a new one will be spawned automatically. If there is a huge load with the database and it decides to crash, the other one auto-spawns.
It still does not remove the risk of having a bad code implementation which it could be trojan-horsed or XSS attacked, but at least we’ve done what we can from the infrastructure side.
CONFIGURATION
Below is some of the brief configuration settings I used for my AWS architecture. Please note that a detailed configuration setting is out of the scope of this article.
Elastic Beanstalk
Configuring EB is relatively easy. From the AWS Console, click on “Services” > Elastic Beanstalk. From there click “Create New Application” and then just follow the wizard. One important thing, you need to ZIP your whole working WordPress folder then upload it through the wizard. This allows EB to deploy the content of the ZIP file to the instances it creates.
I also included .ebextensions folder. In it you can have custom config files that allows you to override php.ini settings such as overriding maximum upload file size, etc. Example of a content of the custom config file is as follows:
files:
“/etc/php-7.0.d/php.ini” :
mode: “000777”
owner: root
group: root
content: |
upload_max_filesize = 64M
post_max_size = 64M
memory_limit = 1280M
max_execution_time = 12000
auto_prepend_file = “/var/app/current/wordfence-waf.php”
Elastic File System
You want EFS to automatically attach to your auto-scaled EC2. To do so, you need to add the config files in .ebextensions folder also. Please follow the instructions below:
https://docs.aws.amazon.com/elasticbeanstalk/latest/dg/php-hawordpress-tutorial.html
This will allow you to override WP’s “wp-content/uploads” folder to use EFS instead.
CloudFront CDN and S3
For using CDN and S3 to store your media files, you need to first provision it. Go to “Services” and S3 and create your bucket. Once done, go to “Services” > CloudFront. You can then create your distribution and point it to your S3 bucket.
Once the distribution is all setup, the next thing is to tell WordPress to upload files to there. I’m using this plugin:
https://wordpress.org/plugins/amazon-s3-and-cloudfront/
The plugin will pretty much override WP’s upload capability to go to S3 instead.
NOTE: Not all modules upload file using WP pipeline. Some modules simply upload to the “wp-content/uploads” folder locally.
Amazon RDS
Go to “Services” > RDS. I simply launched an “Aurora DB Instance”. This is compatible with MySQL, thus, will work with WordPress. Please ensure the “Create Replica in Different Zone” is ticked. This will allow your database to be clustered, thus achieving high availability.
CONCLUSION
So far I can see AWS auto-scale the EC2 instances and we have not had any downtime whatsoever which I’m very well pleased with. After all, it’s 2018 and we can certainly utilise these Cloud services to achieve a 100% uptime for our or client’s website.
Even though this is AWS specific, the good news is, other Cloud providers such as Azure and Google have similar concept. Except, their products are named differently.
Hope this helps,
Tommy
, - Posted by Tommy Segoro
INTRODUCTION
A client of mine is upgrading their SP 2010 environment to SP 2016. As part of the migration work, the RDL files also need to be migrated.
Installing and configuring the SQL Report Service for SharePoint is rather easy. You just run the SQL Install wizard and choose the SQL Reporting for SharePoint features. After that, you provision the Service Application and that’s it.
I then downloaded the RDL files from the old server and re-upload to the new farm. Using the new Report Designer, the RDL file loads fine. However, when I tried to view it as a user, the report does not render. None of the filter buttons work either. I also got the following errors in the browser console:
Refused to apply style from ‘<URL>’ because its MIME type (”) is not a supported stylesheet MIME type, and strict MIME checking is enabled.
Reserved.ReportViewerWebPart.axd:1 Failed to load resource: the server responded with a status of 404 (Not Found)
Reserved.ReportViewerWebPart.axd:1 Failed to load resource: the server responded with a status of 404 (Not Found)
Reserved.ReportViewerWebPart.axd:1 Failed to load resource: the server responded with a status of 404 (Not Found)
Reserved.ReportViewerWebPart.axd:1 Failed to load resource: the server responded with a status of 404 (Not Found)
RSViewerPage.aspx?rv:RelativeReportUrl=/Reports/CorrespondenceProcessingDetailsForStaff – Copy.rdl:1 Refused to execute script from ‘http://intranet/Reserved.ReportViewerWebPart.axd?OpType=Resource&Version=13.0.4001.0&Name=Microsoft.ReportingServices.Rendering.HtmlRenderer.RendererResources.jquery.min.js’ because its MIME type (”) is not executable, and strict MIME type checking is enabled.
Reserved.ReportViewerWebPart.axd:1 Failed to load resource: the server responded with a status of 404 (Not Found)
RSViewerPage.aspx?rv:RelativeReportUrl=/Reports/CorrespondenceProcessingDetailsForStaff – Copy.rdl:1 Refused to execute script from ‘http://intranet/Reserved.ReportViewerWebPart.axd?OpType=Resource&Version=13.0.4001.0&Name=Microsoft.ReportingServices.Rendering.HtmlRenderer.RendererResources.jqueryui.min.js’ because its MIME type (”) is not executable, and strict MIME type checking is enabled.
Reserved.ReportViewerWebPart.axd:1 Failed to load resource: the server responded with a status of 404 (Not Found)
RSViewerPage.aspx?rv:RelativeReportUrl=/Reports/CorrespondenceProcessingDetailsForStaff – Copy.rdl:1 Refused to execute script from ‘http://intranet/Reserved.ReportViewerWebPart.axd?OpType=Resource&Version=13.0.4001.0&Name=Microsoft.ReportingServices.Rendering.HtmlRenderer.RendererResources.Html5Renderer.js’ because its MIME type (”) is not executable, and strict MIME type checking is enabled.
ScriptResource.axd?d=ObD4p27Ocfljw18PB7KdznZSplSvoS6tJOmwvz-KY9WcGgg1RkAnAGP8lZeSQ9CadKWliarHm4H7-lwbPciuMLP7yPKcf99E_OgqMdy7qWNu_TkKaX_Awbmf4oidL7y2_4zrlbghnOUxvsg67aDzZZKhOFDgFMniwOeCOKMDlL4Wk__820o5R59E4J0xAN1C0&t=ffffffffad4b7194:45 Uncaught Error: Sys.ArgumentUndefinedException: Value cannot be undefined.
Parameter name: method
at Function.Error$create [as create] (ScriptResource.axd?d=ObD4p27Ocfljw18PB7KdznZSplSvoS6tJOmwvz-KY9WcGgg1RkAnAGP8lZeSQ9CadKWliarHm4H7-lwbPciuMLP7yPKcf99E_OgqMdy7qWNu_TkKaX_Awbmf4oidL7y2_4zrlbghnOUxvsg67aDzZZKhOFDgFMniwOeCOKMDlL4Wk__820o5R59E4J0xAN1C0&t=ffffffffad4b7194:237)
at Function.Error$argumentUndefined [as argumentUndefined] (ScriptResource.axd?d=ObD4p27Ocfljw18PB7KdznZSplSvoS6tJOmwvz-KY9WcGgg1RkAnAGP8lZeSQ9CadKWliarHm4H7-lwbPciuMLP7yPKcf99E_OgqMdy7qWNu_TkKaX_Awbmf4oidL7y2_4zrlbghnOUxvsg67aDzZZKhOFDgFMniwOeCOKMDlL4Wk__820o5R59E4J0xAN1C0&t=ffffffffad4b7194:361)
at Function$_validateParameterType [as _validateParameterType] (ScriptResource.axd?d=ObD4p27Ocfljw18PB7KdznZSplSvoS6tJOmwvz-KY9WcGgg1RkAnAGP8lZeSQ9CadKWliarHm4H7-lwbPciuMLP7yPKcf99E_OgqMdy7qWNu_TkKaX_Awbmf4oidL7y2_4zrlbghnOUxvsg67aDzZZKhOFDgFMniwOeCOKMDlL4Wk__820o5R59E4J0xAN1C0&t=ffffffffad4b7194:161)
at Function$_validateParameter [as _validateParameter] (ScriptResource.axd?d=ObD4p27Ocfljw18PB7KdznZSplSvoS6tJOmwvz-KY9WcGgg1RkAnAGP8lZeSQ9CadKWliarHm4H7-lwbPciuMLP7yPKcf99E_OgqMdy7qWNu_TkKaX_Awbmf4oidL7y2_4zrlbghnOUxvsg67aDzZZKhOFDgFMniwOeCOKMDlL4Wk__820o5R59E4J0xAN1C0&t=ffffffffad4b7194:130)
at Function$_validateParams [as _validateParams] (ScriptResource.axd?d=ObD4p27Ocfljw18PB7KdznZSplSvoS6tJOmwvz-KY9WcGgg1RkAnAGP8lZeSQ9CadKWliarHm4H7-lwbPciuMLP7yPKcf99E_OgqMdy7qWNu_TkKaX_Awbmf4oidL7y2_4zrlbghnOUxvsg67aDzZZKhOFDgFMniwOeCOKMDlL4Wk__820o5R59E4J0xAN1C0&t=ffffffffad4b7194:84)
at Function$createDelegate [as createDelegate] (ScriptResource.axd?d=ObD4p27Ocfljw18PB7KdznZSplSvoS6tJOmwvz-KY9WcGgg1RkAnAGP8lZeSQ9CadKWliarHm4H7-lwbPciuMLP7yPKcf99E_OgqMdy7qWNu_TkKaX_Awbmf4oidL7y2_4zrlbghnOUxvsg67aDzZZKhOFDgFMniwOeCOKMDlL4Wk__820o5R59E4J0xAN1C0&t=ffffffffad4b7194:41)
at new ReportingServices.WebFormsClient._Toolbar (Reserved.ReportViewerWebPart.axd?OpType=Resource&Version=13.0.4001.0&Name=ViewerScript:5403)
at Sys$Component$create (ScriptResource.axd?d=ObD4p27Ocfljw18PB7KdznZSplSvoS6tJOmwvz-KY9WcGgg1RkAnAGP8lZeSQ9CadKWliarHm4H7-lwbPciuMLP7yPKcf99E_OgqMdy7qWNu_TkKaX_Awbmf4oidL7y2_4zrlbghnOUxvsg67aDzZZKhOFDgFMniwOeCOKMDlL4Wk__820o5R59E4J0xAN1C0&t=ffffffffad4b7194:3811)
at Array.<anonymous> (RSViewerPage.aspx?rv:RelativeReportUrl=/Reports/CorrespondenceProcessingDetailsForStaff – Copy.rdl:704)
at ScriptResource.axd?d=ObD4p27Ocfljw18PB7KdznZSplSvoS6tJOmwvz-KY9WcGgg1RkAnAGP8lZeSQ9CadKWliarHm4H7-lwbPciuMLP7yPKcf99E_OgqMdy7qWNu_TkKaX_Awbmf4oidL7y2_4zrlbghnOUxvsg67aDzZZKhOFDgFMniwOeCOKMDlL4Wk__820o5R59E4J0xAN1C0&t=ffffffffad4b7194:3484
/favicon.ico:1 Failed to load resource: the server responded with a status of 404 (Not Found)
RESOLUTION
The resolution turns out to be very simple. Basically, the viewer won’t work if you turn on debugging ON in web.config.
So, just set the following:
<SafeMode …CallStack=”true”
<customErrors mode=”On” />
<compilation batch=”false” debug=”false”>
Hope this helps,
Tommy
, - Posted by Tommy Segoro
INTRODUCTION
I’m in the process of configuring SharePoint RBS Remote Blob Storage for a client’s SP 2016 on-premise installation. I thought I would be sharing in this article the steps I took to actually make it work. Some of the articles on the net are only partially working, so hopefully this article can paint a complete picture.
There is also additional complexity is that both DEV and UAT environment shares the same instance of SQL server which, by default, RBS installation does not support.
INSTALLING AND CONFIGURING RBS
use [WSS_Content]
if not exists (select * from sys.symmetric_keys where name = N’##MS_DatabaseMasterKey##’) create master key encryption by password = N’Admin Key Password !2#4′
—
use [WSS_Content]
if not exists
(select groupname from sysfilegroups
where groupname=N’RBSFilestreamProvider’)
alter database [WSS_Content]
add filegroup RBSFilestreamProvider contains filestream
—
use [WSS_Content]
alter database [WSS_Content]
add file (name = RBSFilestreamFile, filename =
‘c:\Blobstore’)
to filegroup RBSFilestreamProvider
Change C:\Blobstore above to any drive you wish to store the blob storage files in.
4. Still in the SQL Server, download RBS.msi from the following:
For SharePoint Server 2016, choose the correct install from the following list:
5. Still in SQL Server, open Command Prompt as Administrator and run the following in the folder you download RBS.msi into:
msiexec /qn /lvx* rbs_install_log.txt /i RBS.msi TRUSTSERVERCERTIFICATE=true FILEGROUP=PRIMARY DBNAME=“WSS_Content” DBINSTANCE=“DBInstanceName” FILESTREAMFILEGROUP=RBSFilestreamProvider FILESTREAMSTORENAME=FilestreamProvider_1
Note in Red above the values you need to update to reflect your environment.
Once you have run the above, go to “Programs and Features” in Control Panel and you should be able to see SQL Remote Blob Storage application installed.
Also, if you open the log file rbs_install_log.txt, near at the very end of the file you should see this text:
Product: SQL Remote Blob Storage – Installation completed successfully.
Furthermore, through SQL Management Studio, if you reload your content database, you would be able to see RBS tables created. They are denoted with the word “mssqlrbs“.
6. Now, go to your SP Server. If you have multiple servers in your farm, starts with Central Admin server first. Download RBS.msi again from the link above. I would simply copy RBS.msi from SQL Server to my SP server. Then, in SP Server, open Command Prompt as Administrator, go to where RBS.msi is located and run the following:
msiexec /qn /lvx* rbs_install_log.txt /i RBS.msi DBNAME=”WSS_Content” DBINSTANCE=”DBInstanceName” ADDLOCAL=Client,Maintainer,ServerScript,FilestreamClient,FilestreamServer
Similar to previously, go to “Programs and Features” and you should see SQL RBS installed. In the log file you would also be able to see a successful message near the end of the file.
Repeat step 6 for all servers in your farm. This command is pretty much installing RBS client onto your SP environment.
7. Ensure your Farm Account and IIS App Pool account of your SP web application is a dbo in the content database. This would allow SharePoint to communicate with RBS.
8. Then, in your SP Central Admin server, open SharePoint Management Shell and run the following:
$cdb = Get-SPContentDatabase WSS_Content
$rbss = $cdb.RemoteBlobStorageSettings
$rbss.Installed()
$rbss.Enable()
$rbss.SetActiveProviderName($rbss.GetProviderNames()[0])
$rbss
The command above switches your SharePoint site from using content DB storage to using RBS storage for file uploads.
9. Finally, test if RBS is working. To do that, simply go to any library in your SP web app, and just upload any document. Then, go to SQL Server and go to your RBS drive eg. c:\Blobstore. You should be able to see your uploaded files in there.
INSTALLING MULTIPLE RBS FOR DIFFERENT ENVIRONMENT USING SAME SQL INSTANCE
As mentioned earlier, this particular client of mine only has 1 SQL Server with the same instance for their DEV and TEST environment. Now that we’ve configured RBS for, let’s say, DEV, we need to run the same for the TEST environment.
You may think that you can just simply repeat the steps, the thing is, we’ve already installed RBS on the SQL Server and is already running as a program there. So how do we do this? If you have similar scenario, follow the steps below:
use [WSS_Content_TEST]
if not exists (select * from sys.symmetric_keys where name = N’##MS_DatabaseMasterKey##’) create master key encryption by password = N’Admin Key Password !2#4′
—
use [WSS_Content_TEST]
if not exists
(select groupname from sysfilegroups
where groupname=N’RBSFilestreamProvider2‘)
alter database [WSS_Content_TEST]
add filegroup RBSFilestreamProvider2 contains filestream
—
use [WSS_Content_TEST]
alter database [WSS_Content_TEST]
add file (name = RBSFilestreamFile2, filename =
‘c:\BlobstoreTEST‘)
to filegroup RBSFilestreamProvider2
Please ensure the text highlighted in blue isn’t the same as the first one, otherwise it will not work.
2. Still in SQL Server, run the following but please ensure you’re using the new configuration:
msiexec /qn /lvx* rbs_install_log.txt /i RBS.msi TRUSTSERVERCERTIFICATE=true FILEGROUP=PRIMARY DBNAME=”WSS_Content_TEST” DBINSTANCE=”DBInstanceName” FILESTREAMFILEGROUP=RBSFilestreamProvider2 FILESTREAMSTORENAME=FilestreamProvider_2
3. Then in your 2nd SP Farm ie. TEST, run the following:
msiexec /qn /i rbs.msi REMOTEBLOBENABLE=1 FILESTREAMPROVIDERENABLE=1 DBNAME=”WSS_Content_TEST” FILESTREAMSTORENAME=FilestreamProvider_2 ADDLOCAL=EnableRBS,FilestreamRunScript DBINSTANCE=”DBServer”
4. Finally, in Central Admin run the following in SP Shell:
$cdb = Get-SPContentDatabase WSS_Content_TEST
$rbss = $cdb.RemoteBlobStorageSettings
$rbss.Installed()
$rbss.Enable()
$rbss.GetProviderNames()
$rbss.SetActiveProvider(‘FilestreamProvider_2‘)
$rbss
You should see “FilestreamProvider_2” displayed in the Management Shell. This indicates that your TEST environment is now connected to the 2nd RBS in the same SQL server.
Hope this helps,
Tommy
, - Posted by Tommy Segoro
INTRODUCTION
Drupal is somehow a selected content management system by a lot of government bodies in Western Australia. While it’s a great little system, I still feel that it needs a lot of improvements especially around the search area.
One thing that struck me was the fact that it did not index the final rendered HTML content. Yes it can index content fields fine, but it definitely does not index the final rendered HTML – which sucks in my opinion. The reason is, you would have had a lot of custom content blocks dropped onto the different content placeholders which would appear on your content pages. But, since the only content indexed is your main page content field, when you try to look for a text within your rendered custom blocks, the search results won’t return the corresponding page(s) where the blocks may be loaded to.
I’ve installed Search API and have tried using the default index or even SOLR! And yet both came to no avail. The main reason behind it is not so much about the search technology, but rather the content passed from Drupal to these search indexer does not contain the full rendered HTML content. Therefore, no matter what search technology you use, it won’t return the proper results since the content is never indexed in the first place.
RESOLUTION
Finally, after some fiddling around, I found a workable solution! And no, it’s not installing Google search but rather a modification to the search API file.
Search API introduced a search field called “Rendered Item”. You can add this field in the Fields area of your index, as well as your Search API Pages. The idea behind it is great, that is to render the actual HTML output of the field. Therefore, I hijack this field to index the actual page’s HTML output instead of just the field’s HTML output – if that makes sense?
Anyway, the Rendered Item column is contained within this file:
\modules\search_api\src\Plugin\search_api\processor\RenderedItem.php
This is the line that actually adds the field value into the index:
public function addFieldValues(ItemInterface $item)
So, I hijack it to include the rendered page HTML. I’m using this method to download the rendered page HTML:
file_get_contents
My method now looks like below. Please look at the line in red and green.
function SiteURL()
{
$protocol = (!empty($_SERVER[‘HTTPS’]) && $_SERVER[‘HTTPS’] !== ‘off’ || $_SERVER[‘SERVER_PORT’] == 443) ? “https://” : “http://”;
$domainName = $_SERVER[‘HTTP_HOST’].’/’;
return $protocol.$domainName;
}
/**
* {@inheritdoc}
*/
public function addFieldValues(ItemInterface $item) {
$original_user = $this->currentUser->getAccount();
// Switch to the default theme in case the admin theme is enabled.
$active_theme = $this->getThemeManager()->getActiveTheme();
$default_theme = $this->getConfigFactory()
->get(‘system.theme’)
->get(‘default’);
$default_theme = $this->getThemeInitializer()
->getActiveThemeByName($default_theme);
$this->getThemeManager()->setActiveTheme($default_theme);
// Count of items that don’t have a view mode.
$unset_view_modes = 0;
$fields = $this->getFieldsHelper()
->filterForPropertyPath($item->getFields(), NULL, ‘rendered_item’);
foreach ($fields as $field) {
$idString = $item->getId() . ”;
if(strpos($idString, ‘node/’) != false)
{
$idString = str_replace(“entity:node/”, “”, $idString);
$idString = str_replace(“:en”, “”, $idString);
$html = \file_get_contents($this->SiteURL() . ‘/node/’ . $idString);
$field->addValue($html);
}
else
{
$configuration = $field->getConfiguration();
// Change the current user to our dummy implementation to ensure we are
// using the configured roles.
$this->currentUser->setAccount(new UserSession([‘roles’ => $configuration[‘roles’]]));
$datasource_id = $item->getDatasourceId();
$datasource = $item->getDatasource();
$bundle = $datasource->getItemBundle($item->getOriginalObject());
// When no view mode has been set for the bundle, or it has been set to
// “Don’t include the rendered item”, skip this item.
if (empty($configuration[‘view_mode’][$datasource_id][$bundle])) {
// If it was really not set, also notify the user through the log.
if (!isset($configuration[‘view_mode’][$datasource_id][$bundle])) {
++$unset_view_modes;
}
continue;
}
else {
$view_mode = (string) $configuration[‘view_mode’][$datasource_id][$bundle];
}
$value = (string) $this->getRenderer()->renderPlain($build);
if ($value) {
$field->addValue($value);
}
}
}
// Restore the original user.
$this->currentUser->setAccount($original_user);
// Restore the original theme.
$this->getThemeManager()->setActiveTheme($active_theme);
if ($unset_view_modes > 0) {
$context = [
‘%index’ => $this->index->label(),
‘%processor’ => $this->label(),
‘@count’ => $unset_view_modes,
];
$this->getLogger()->warning(‘Warning: While indexing items on search index %index, @count item(s) did not have a view mode configured for one or more “Rendered item” fields.’, $context);
}
}
Basically, I’m just telling Drupal, if you load a content node, download the full page HTML output and add it to the index.
if(strpos($idString, ‘node/’) != false)
{
$idString = str_replace(“entity:node/”, “”, $idString);
$idString = str_replace(“:en”, “”, $idString);
$html = \file_get_contents($this->SiteURL() . ‘/node/’ . $idString);
$field->addValue($html);
}
The addValue(string) is the method that adds any string to the index.
DONE!
Delete all item from the index, then do a full re-index 🙂
NOTE: As this is updating Search API’s system file, when you upgrade the module, ensure you re-apply the changes because it would have been overridden by the upgrade.
Hope this helps,
Tommy
, - Posted by Tommy Segoro
INTRODUCTION
Sitecore has released version 9.0 not too long ago. I should say, I’m probably quiet late coming into the game because by the time I wanted to install it, they have already released the Update 1. In this article I just would like to go through with you the install process just simply because it’s a b**ch. They have now get rid of the EXE and using Powershell instead.
Maybe I’m just whining, but for a $90k+ product I would expect better, a wizard or some sort. SharePoint at least provides us with wizard and that helps us a lot in getting it up and running pretty quickly.
Anyway, let me just run you through my install process.
PS: This is for Single Instance install and not for Azure or for the scalable option.
STEPS
INSTALLING SOLR
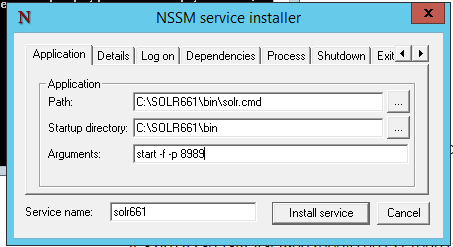
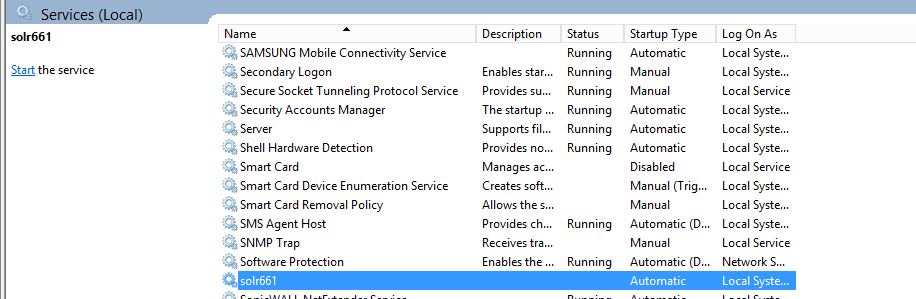
OK, during the install process I encountered the following issues:
The script would eventually fail if you use any of the above.
CONFIGURING SITECORE
Once the install is finished, go to your C:\inetpub\wwwroot folder. Your Sitecore website is now fully installed and running.
Before you get too excited, the analytics database is no longer using MongoDB, rather it creates an “xconnect” website. In IIS, Sitecore creates 2 websites for me:
http://tfs.sc ==> Sitecore
https://tfs.xconnect ==> The xconnect/analytics website
A lot of people including myself encountered issue trying to connect to the xconnect website. The issue is centered around certificate! Without the xconnect running, your analytics would be disabled, and you would see tons of errors in the log file. Experience Analytics will also show error messages.
So, try to go to your xconnect website https://tfs.xconnect. For me, it asked me to specify client certificate. I’m running Windows 10 and by default it has 2 client certificates available. If you select any of them it would fail, because what you need to use is Sitecore’s XConnect client certificate. The error message you would get is:
HTTP Error 403.16 – Forbidden Your client certificate is either not trusted or is invalid.
As part of your JSON install previously, it runs xconnect-createcert.json which would have created the client certificate for you. Except, it doesn’t add it to the browser. So, to add the XConnect client certificate:
Done…you’re all setup now. You now can run the post deployment steps such as building index, etc.
OTHER ERRORS YOU MAY ENCOUNTER
Along the way, some of the “FilePermission” steps may fail. It did not fail on my Windows 10 laptop, but it did on Windows Server 2012 R2. Simply comment them out:
//”SetAppPoolCertStorePermissions”: {
// Set permissions for the App Pool User to access the client certificate.
// “Type”: “FilePermissions“,
// “Params”: {
// “Path”: “[ResolveCertificatePath(variable(‘Security.XConnect.CertificatePath’))]”,
// “Rights”: [
// {
// “User”: “[concat(‘IIS AppPool\\’, parameter(‘SiteName’))]”,
// “FileSystemRights”: [ “Read” ],
// “InheritanceFlags”: [ “None” ]
// }
// ]
// }
//},
There are multiple of them found in xconnect-xp0.json and sitecore-xp0.json. I don’t think this is a big deal because basically it just gives file permission to the Sitecore folder as well as the XConnect certificate which you can do manually. The main thing is to get the install finished first.
Hope this helps!
Tommy
We provides you the best Services in our themes.
Click on the link below to see a full list of clients which we have developed solutions and provided consultancy for.
We are solution-centered and not application-centered.
Being creative and having fun and yet still delivering a fantastic service is the center of our values.
TFS Consulting Services guarantees delivery that is within budget and deadline or you engage us for free.

Implementing IT solution does not have to be difficult. TFS Consulting Services has a lot of resources on planning and methodologies that will ensure successful delivery of your IT solution. TFS Consulting Services has been around in the web industry for more than 10 years and has experienced all the successes and failures of various type of IT deployment.

Do you need a technical resource? TFS Consulting Services can also provide you with technical resource for developing ASP.NET (C# and VB.NET), SharePoint (2003, 2007, 2010, 2013) and MS CRM applications. Our resource is an Microsoft Certified Personnel (MVP) and Microsoft Certified Technology Specialist (MCTS) in all ASP.NET, SharePoint and CRM.

Make sure your IT implementation is robust and scalable. TFS Consulting Services can provide consulting and advice on industry’s best practice on various web-related areas such as website security, design and usability, application-specific (such as SharePoint)’s best practice, Search Engine Optimisation (SEO), coding standards and many others.

Finally TFS Consulting Services provides you with solution development service. We mainly work with Microsoft technologies (ie. .NET and SQL Server), however we are also capable of developing with PHP and MySQL. If you ever need any business process automation, integration and solution development work, we are the trusted expert you should go to.
For more detailed service offerings please visit our Solutions page.
Tommy Segoro
tommy@tfsconsulting.com.au
+61 404 457 754
© TFS Consulting Services 2026. All rights reserved.