How to Install Sitecore Experience Platform 9.0 Update 1

Posted in: Blog, Sitecore |

No comments

INTRODUCTION

Sitecore has released version 9.0 not too long ago. I should say, I’m probably quiet late coming into the game because by the time I wanted to install it, they have already released the Update 1. In this article I just would like to go through with you the install process just simply because it’s a b**ch. They have now get rid of the EXE and using Powershell instead.

Maybe I’m just whining, but for a $90k+ product I would expect better, a wizard or some sort. SharePoint at least provides us with wizard and that helps us a lot in getting it up and running pretty quickly.

Anyway, let me just run you through my install process.

PS: This is for Single Instance install and not for Azure or for the scalable option.

STEPS

  1. Download the Installation Guide PDF from Sitecore website
  2. Install SQL 2016, I used Developer edition. You do NOT want to use SQL 2012 because install will fail!
  3. If your SQL is separate from your Sitecore server, Ensure your SQL 2016 can be discovered through network. Go to SQL Configuration Manager and ensure TCP/IP protocol is enabled. Then also check through SQL Management Studio that both Windows Authentication and SQL Authentication are enabled for your DB server, and “Allow remote connection” is also ticked.
  4. From within Sitecore PDF document ensure the prerequisites specified in 2.3.2 is met.
  5. Install SOLR and enable SSL! Sitecore 9 is now using SOLR and not Lucene.

INSTALLING SOLR

  1. Please ensure that you DO NOT USE SOLR 7 or it won’t be compatible! You would only find that out during the Sitecore Powershell script execution. For me, I used 6.6.1 and that worked fine.
  2. To install SOLR I downloaded the ZIP package instead of the Bitnami executable version. Download from this link: http://archive.apache.org/dist/lucene/solr/6.6.1/solr-6.6.1.zip
  3. Then unzip it to, let’s say C:\SOLR661
  4. Next, you need to add Sitecore’s Schema.XML into C:\SOLR661\server\solr\configsets\basic_configs\conf. Lucky I’ve made this available myself through my article. Therefore, please download from here http://www.tfsconsulting.com.au/wp-content/uploads/schema.original.xml and put it into the basic_configs\conf and rename it to schema.xml.
  5. Once that’s done, you’ll now need to enable SSL. Before I let you reading the SOLR article on enabling SSL, I would like to warn you that you need to make the SOLR SSL port to 8989! The article is here: https://lucene.apache.org/solr/guide/6_6/enabling-ssl.html. Where it says “bin\solr.cmd -p 8984” in the article, you want to change the port number to “bin\solr.cmd -p 8989”.
  6. Once you’ve done that, during the process it would have created a solr-ssl.keystore.p12 file. Add and install this certificate into your Personal and Trusted Root Certificate area.
  7. Check if SOLR can be accessed using SSL on port 8989 by going to https://localhost:8989/solr. If it works, next thing is to make SOLR run as Windows Service. At the moment, after step 5, SOLR is running as an executable service however you don’t know what the service name is which we will need for the Powershell script to work. So, let’s stop this service. To do this, open Command Prompt and navigate to C:\SOLR661\bin. Then run solr.cmd stop -p 8989. This will stop the SOLR service.
  8. To install SOLR as Windows Service use this tool: https://nssm.cc/download
  9. Once installed, through Command Prompt run: “c:\Program Files\nssm\win64\nssm” install solr661
  10. A dialog will come up and simply select the “solr.cmd” file and in the arguments, ensure it is start -f -p 8989. Below is the example screenshot:
  11. Click Install Service. Then your SOLR service is available as a Windows Service:
  12. Start it. Then confirm if SOLR is now running again in SSL port 8989 ie. https://localhost:8989/solr
  13. Once it’s working, now we’re ready to install Sitecore 9.0! Now go back to Sitecore Downloads page and download the “Packages for XP Single“.
  14. Ensure Sitecore Installation Framework (SIF) for Powershell is enabled! Follow the instructions from this document: Sitecore-Installation-Framework-Configuration-Guide-1.1.pdf. This is all available through the Sitecore Downloads page.
  15. If SIF is installed correctly, you’ll be able to run this command from Powershell to verify: Get-Module SitecoreInstallFramework –ListAvailable
  16. If all looks good, lets now unzip the Sitecore 9.0.1 rev. 171219 (WDP XP0 Packages).zip you download as part of step 12. Let’s unpack them to c:\resourcefiles.
  17. Another thing you want to install is SQLCMD. You can download from here: https://www.microsoft.com/en-us/download/details.aspx?id=53591
  18. Once installed, verify if SQLCMD is available through System Path. To do that, Open Command Prompt and simply type “sqlcmd”. If it says command not recognised then you need to add the path in your Environment Variables. This is needed because Powershell script uses sqlcmd to execute some of its SQL statements!
  19. OK let’s now look at the unzipped file from Step 15. You should see 3 files. What you want to unzip further is XP0 Configuration files 9.0.1 rev. 171219.zip which will contain the SIF Configuration files (in .json extension). Put them on all in the same folder C:\resourcefiles.
  20. Now, go back to your Sitecore install PDF and look at section 4.2.2 item 4. Sitecore has provided a set of script to call those JSON files all in the correct order. If you copy paste from the PDF directly, it contains errors, mainly spacing and text encoding. However, without fixing this, you’ll be in trouble. For example, the Package variables goes like below: 
  21. Package = “$PSScriptRoot\Sitecore 9.0.1 rev. 171219
    (OnPrem)_xp0xconnect.scwdp.zip”


  22. While it should be:
  23. Package = “$PSScriptRoot\Sitecore 9.0.1 rev. 171219 (OnPrem)_xp0xconnect.scwdp.zip” ==> All in one line!
  24. So you’ll need to be fixing all the spacing issue. Finally, the part you want to modify is this section:
  25. #define parameters
    $prefix = “TFS” ==> This would be your Sitecore instance name
    $PSScriptRoot = “C:\resourcefiles”
    $XConnectCollectionService = “$prefix.xconnect”
    $sitecoreSiteName = “$prefix.sc”
    $SolrUrl = “https://localhost:8989/solr”
    $SolrRoot = “C:\Solr-6.6.1”
    $SolrService = “solr661==> This will be using the Windows Service name you created previously!
    $SqlServer = “TFS\TFSDEV01”
    $SqlAdminUser = “sa”
    $SqlAdminPassword=”Password12345″
  26. Save the file as install.ps1 and place it in C:\resourcefiles.
  27. Once that’s all done, run the install.ps1 from Powershell. The whole process would take up to 30 minutes to finish depending on how fast your server is.

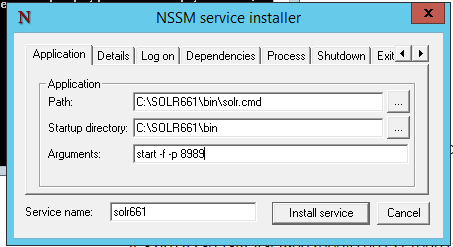
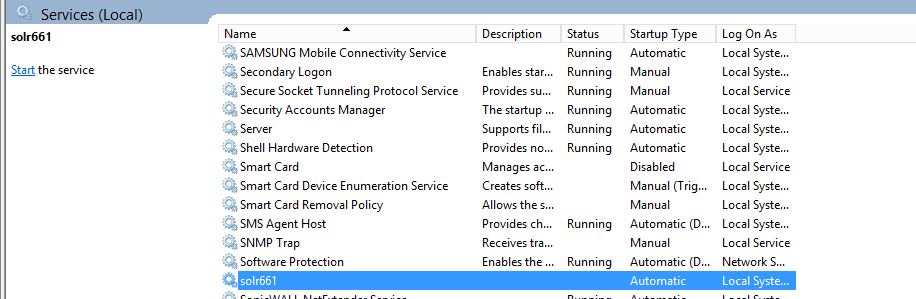
OK, during the install process I encountered the following issues:

  • Using SQL 2012
  • SQLCMD not installed
  • Using the latest SOLR 7 instead of 6.6.1 or 6.6.2

The script would eventually fail if you use any of the above.

CONFIGURING SITECORE

Once the install is finished, go to your C:\inetpub\wwwroot folder. Your Sitecore website is now fully installed and running.

Before you get too excited, the analytics database is no longer using MongoDB, rather it creates an “xconnect” website. In IIS, Sitecore creates 2 websites for me:

http://tfs.sc ==> Sitecore
https://tfs.xconnect ==> The xconnect/analytics website

A lot of people including myself encountered issue trying to connect to the xconnect website. The issue is centered around certificate! Without the xconnect running, your analytics would be disabled, and you would see tons of errors in the log file. Experience Analytics will also show error messages.

So, try to go to your xconnect website https://tfs.xconnect. For me, it asked me to specify client certificate. I’m running Windows 10 and by default it has 2 client certificates available. If you select any of them it would fail, because what you need to use is Sitecore’s XConnect client certificate. The error message you would get is:

HTTP Error 403.16 – Forbidden Your client certificate is either not trusted or is invalid.

As part of your JSON install previously, it runs xconnect-createcert.json which would have created the client certificate for you. Except, it doesn’t add it to the browser. So, to add the XConnect client certificate:

  1. Open Command Prompt and type in “mmc”
  2. Add the Certificates snap-in
  3. In your Personal tab, you would have seen the XConnect client certificate. Download it and ensure you include the private key, thus will ask you to save it as a pfx file. Tick the “Include all certificates in the certificate path if possible” and “Export all extended properties”. Save it to a file.
  4. Then go to Internet Explorer > Internet Options > Content > Certificates. Under Personal tab simply Import the client certificate.
  5. Close your browser and perform IISRESET.
  6. Visit your xconnect website again, https://tfs.xconnect for me. It should show some numbers on the screen if successful.
  7. Finally, go to Sitecore and confirm if Experience Analytics works.

Done…you’re all setup now. You now can run the post deployment steps such as building index, etc.

OTHER ERRORS YOU MAY ENCOUNTER

Along the way, some of the “FilePermission” steps may fail. It did not fail on my Windows 10 laptop, but it did on Windows Server 2012 R2. Simply comment them out:

//”SetAppPoolCertStorePermissions”: {
// Set permissions for the App Pool User to access the client certificate.
// “Type”: “FilePermissions“,
// “Params”: {
// “Path”: “[ResolveCertificatePath(variable(‘Security.XConnect.CertificatePath’))]”,
// “Rights”: [
// {
// “User”: “[concat(‘IIS AppPool\\’, parameter(‘SiteName’))]”,
// “FileSystemRights”: [ “Read” ],
// “InheritanceFlags”: [ “None” ]
// }
// ]
// }
//},

There are multiple of them found in xconnect-xp0.json and sitecore-xp0.json. I don’t think this is a big deal because basically it just gives file permission to the Sitecore folder as well as the XConnect certificate which you can do manually. The main thing is to get the install finished first.


Hope this helps!

Tommy

Written by

A web solution expert who has passion in website technologies. Tommy has been in the web industry for more than 10 years. He started his career as a PHP developer and has now specialized in ASP.NET, SharePoint and MS CRM. During his career he has also been in many roles: system tester, business analyst, deployment and QA manager, team and practice leader and IT manager.

No Comments Yet.

Leave a Reply

You must be logged in to post a comment.

Our Services

We provides you the best Services in our themes.

  • Click on the link below to see a full list of clients which we have developed solutions and provided consultancy for.

    READ MORE

  • We are solution-centered and not application-centered.

    READ MORE

  • Being creative and having fun and yet still delivering a fantastic service is the center of our values.

    READ MORE

  • TFS Consulting Services guarantees delivery that is within budget and deadline or you engage us for free.

    READ MORE

Implementing IT does not have to be difficult.

As long as you have the right methodologies

We have heard a lot of complaints from our clients that IT a lot of the times give them headache. The issues range from over-budget implementation, server is too hard to maintain, application is not user friendly, features not complete and many others. If you have ever experienced similar situations, don’t worry. This is why TFS Consulting Services is here. We exist to help clients implementing a successful IT solution. We have various methodologies which we have proven working in delivering a successful IT implementation. Below is the list of some of our key service offerings:
  • Planning and Methodologies

    Implementing IT solution does not have to be difficult. TFS Consulting Services has a lot of resources on planning and methodologies that will ensure successful delivery of your IT solution. TFS Consulting Services has been around in the web industry for more than 10 years and has experienced all the successes and failures of various type of IT deployment.

    read more

  • Technical Resource

    Do you need a technical resource? TFS Consulting Services can also provide you with technical resource for developing ASP.NET (C# and VB.NET), SharePoint (2003, 2007, 2010, 2013) and MS CRM applications. Our resource is an Microsoft Certified Personnel (MVP) and Microsoft Certified Technology Specialist (MCTS) in all ASP.NET, SharePoint and CRM.

    read more

  • IT Consulting & Advice

    Make sure your IT implementation is robust and scalable. TFS Consulting Services can provide consulting and advice on industry’s best practice on various web-related areas such as website security, design and usability, application-specific (such as SharePoint)’s best practice, Search Engine Optimisation (SEO), coding standards and many others.

    read more

  • Solution Development

    Finally TFS Consulting Services provides you with solution development service. We mainly work with Microsoft technologies (ie. .NET and SQL Server), however we are also capable of developing with PHP and MySQL. If you ever need any business process automation, integration and solution development work,  we are the trusted expert you should go to.

    read more

For more detailed service offerings please visit our Solutions page.

Testimonials

  • I’m happy to recommend Tommy as a knowledgeable and diligent developer.

    Mike Stringfellow, Vivid Group
  • Tommy has a lot of great ideas that can be delivered into great products. It’s a pleasure working with him because he has a broad knowledge about available technologies out there and he knows what’s best for the client’s needs. He just knows how to work effectively and efficiently.

    Teddy Segoro, Student Edge
  • I’ve worked with Tommy over the past 6 months and have found his approach to development (especially SharePoint) absolutely outstanding. Tommy goes beyond the boundries of typical software development with his ability understand what a client requires and then build it into fully fledged software solution. Coupled with his professional “Best Practice” approach, you get Continue Reading

    Michael Bonham, DSC-IT

Contact us

Tommy Segoro
tommy@tfsconsulting.com.au
+61 404 457 754


© TFS Consulting Services 2024. All rights reserved.

www.incorporator.com.au