, - Posted by Tommy Segoro
INTRODUCTION
Hi guys,
I have this requirement from the client to display the paging control on Top and Bottom on list view (or document libraries). By default SharePoint only displays the paging at the bottom. This article details on how to do it on both list view page or list view web part.
What you need:
– SharePoint Designer 2010 or 2013
HOW TO DO IT
List View Page
The list view page is the page that is used by the lists or document libraries to list your items and documents (ie. AllItems.aspx). You can also create your own custom view page before customizing it.
To customize it:
– Open SP Designer;
– Go to your list view page eg. AllItems.aspx;

– Then edit the page;
– Then go to this section <WebPartPages:XsltListViewWebPart>…… this is where the actual web part is;
– On the ribbon, go to DESIGN > Customize XSLT > Customize Entire View;

– Once you click that button, an <xsl>…</xsl> section is displayed with a lot of XSLT tags within it. This is the stuff that you want to use to modify the view of that web part.
– To show the paging at the top and bottom for example, copy the following line:
<xsl:call-template name=”pagingButtons” />
and paste it before the <table> tag, save the file and voila…you have paging on top and bottom:

You can further play around with the XSLT. Save the document and refresh the list view page and you will see the updated look and feel.
List View Web Part
Once you create a list or document library, you can then drop and drag it to a content page as a web part. Unfortunately you don’t have the flexibility of modifying the page to do the above. Therefore, the work around is:
– Go to your list or document library, then create a custom view. SharePoint will then create a List View Page for your view (eg. Test.aspx);
– Open SharePoint Designer and modify the List View Page as the above;
– Now, this is where it’s a bit different! Copy the content of <xsl>…..</xsl> WITHOUT the opening and closing <xsl></xsl> tag into a file and save it as YourFilename.xsl. The content of the file should start with <xsl:stylesheet>….
– Upload the XSL file to SharePoint site (eg. into Style Library);
– Go to your content page, drop the list/document library as a web-part on the page;
– Then go to Miscellaneous > XSL Link then specify the location to your uploaded XSL, save the web-part and voila!


Hope this helps,
Tommy
, - Posted by Tommy Segoro
INTRODUCTION
I upgraded my SharePoint 2010 site to SharePoint 2013. One of the features I’ve built installs custom web site templates that are meant to be available from Create Site page. After upgrading somehow my custom web templates are not displaying.
SOLUTION
SharePoint 2013 can run in SharePoint 2010 mode except for that web templates, you have to explicitly specify the UIVersion otherwise your restored SharePoint 2010 site won’t recognise the web templates.
Therefore, open ONET.XML of your web template feature and in the <Project> tag add UIVersion=”4″ so it look something like below:
<Project Title=”Events” Revision=”2″ ListDir=”” xmlns:ows=”Microsoft SharePoint” xmlns=”http://schemas.microsoft.com/sharepoint/” UIVersion=”4″>
Hope this helps,
Tommy
, - Posted by Tommy Segoro
INTRODUCTION
I created a self-signed certificate for my SharePoint 2013 sites. When I accessed the site it returned blank! Nothing!
Then I checked Event Viewer and I get the following error:
SSL policy errors have been encountered. Error code ‘0x2’..
RESOLUTION
Go to your SharePoint site web.config and add the following line within <system.net> tag:
<settings>
<servicePointManager
checkCertificateName=”false”
checkCertificateRevocationList=”false”
/>
</settings>
That fixed it for me! Yippee!
Tommy
, - Posted by Tommy Segoro
INTRODUCTION
SQL Clustering is awesome for HA (high availability). In this instance I was tasked to install and configure Production DMZ environment for my client’s Internet sites. We want to use clustering so that it improves availability (ie. when the main SQL server goes down, the second one can be up and running straight away).
Setting up SQL Clustering can be both tricky and easy at the same time. As long as we know what we need and the steps required, we should be fine.
The servers are within Virtual Machine realm and managed using VMWare. In this article I’m using SQL Server 2012 and Windows Server 2012 but the same process can be used with Windows Server 2008 R2 and SQL Server 2008 R2.
The stuff you need:
– A dedicated VM for the shared drives (let’s call the machine name VMDRIVES)
– 3 drives to be attached to VMDRIVES (let’s name them E:\SQLDATA 100GB, F:\SQLLOGS 100GB , G:\DTC 10GB) –> NOTE: Your drive letters may be different and that’s OK. Do not forget to format and make the disks available in Disk Management.
– A dedicated VM for Main Cluster node (let’s call the machine name VMSQL1)
– A dedicated VM for secondary node (let’s call the machine name VMSQL2)
– A dedicated VM for SharePoint Application Server (let’s call the machine name VMSPCA)
– A dedicated VM for SharePoint WFE (let’s call the machine name VMSPWFE)
– At least 5 IP Addresses (1 for VMDRIVES, 1 for VMSQL1, 1 for VMSQL2, 1 for CLUSTER, 1 for DTC)
NOTE: You can have as many cluster nodes and SharePoint servers as necessary but the above is what I have.
NOTE: You should NOT attached any shared drives directly to your SQL server. The drives will NOT be able to be added to the cluster. Somehow when you turn on Clustering Service on a server, it can’t add any shared drives attached to the clustered server. This is why you will need a dedicated VM for your shared drives.
So, the steps to configure the clustering is as follows:
CONFIGURE SHARED DRIVES
The shared drives need to be configured first. Go to VMDRIVES -> Server Manager and add the following role:
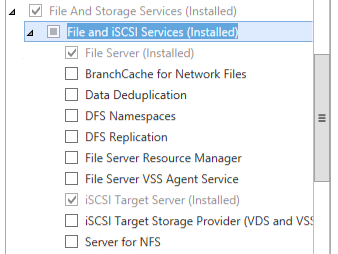
This is sort of saying that this server is a File and Storage Services server where the shared drives will be.
After it is installed, go to Server Manager -> File and Storage Services -> iSCSI. You will not see any drive. So, what we want to do next is to promote the 3 drives you want to use as the cluster. To do this repeat the following step:
– Right click and select “New iSCSI Virtual Disk”
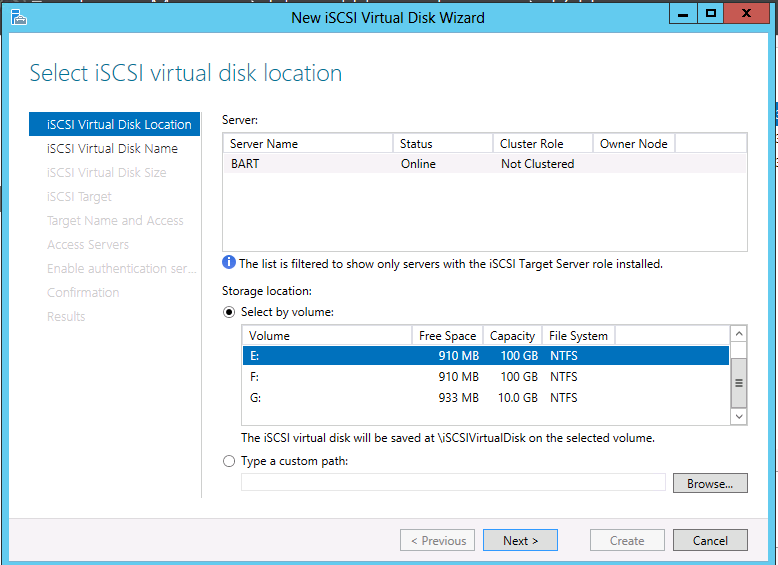
– On iSCSI Virtual Disk Location: Select a particular disk you want to use. For the first one I want to promote the E:\ drive which will be the SQL Data drive.
– On iSCSI Virtual Disk Name: Give it a name and description eg. SQLData
– On iSCSI Virtual Disk Size: Assign a space. I have a 100GB disk but I will only use 90GB just in case it needs to assign some system data on top of it.
– On iSCSI Target: Click on “New iSCSI target”
– On Target Name and Access: Assign a name and description eg. SQLData
– On Access Servers: Access Servers are the servers that will be accessing the shared drive. In this case are the cluster servers: VMSQL1 and VMSQL2. Add the IP addresses of VMSQL1 and VMSQL2.
– On Enable authentication: Leave blank.
Click Next and it should configure the drives successfully.
Repeat the steps for the other 2 drives (SQL Logs and DTC).
CONFIGURE SHARED DRIVE ACCESS
Now that the shared drives have been configured, you now need to configure the access to them from VMSQL1 and VMSQL2.
So, the steps are:
– Go to VMSQL1 -> Control Panel -> iSCSI Initiator. It will ask you to start the service if it has not been started. Just click Yes/OK.
– Then on the following screen specify the target IP address (ie. the IP adress of VMDRIVES). You should then be able to see all shared drives. You need to connect to ALL of them:

Once you’ve done this the drives should be available in Disk Management of VMSQL1. So, on Disk Management make sure you bring all the shared drives online and format them using NTFS and assign each one of them a drive letter.
Repeat the steps above for VMSQL2.
CONFIGURE CLUSTER
Now, we’re ready to go into the next step: the cluster configuration.
Go to VMSQL1 -> Server Manager and install the following Feature:
– .NET Framework 3.5 Features
– Failover Clustering
Go to VMSQL2 and do the same.
Then go to VMSQL1 -> Administrative Tools and you should be able to see a menu called Failover Cluster Manager. Click it and let’s configure the cluster. When you click that menu you will see a screen something like below:

The next outstanding steps to complete the cluster are:
– Create cluster
– Setting up cluster disks
– Setting up Distributed Transaction Coordinator (DTC)
To create cluster click on Failover Cluster Manager -> Create Cluster.
On Select Servers, select the two servers for cluster which is VMSQL1 and VMSQL2. Then on Access Point for Administering the Cluster specify the IP address and the network name for the cluster. For SQL connection you can use the SQL cluster name instead. I’ll explain that later. Then simply finish off the wizard.
Next is the cluster disk configuration. To setup the cluster disk, right click on Storage -> Disks and click Add Disk. Select all the 3 disks you’ve created and shared previously. You should get ONLINE status for all the 3 disks.
Once you’ve setup the disks let’s now setup the DTC. Click on Roles and select Configure Role. Then select Distributed Transaction Coordinator (DTC). Then specify a name eg. CLUSTERDTC and a dedicated IP address. Then select the quorum/DTC dedicated storage. Once you’ve done that simply confirm the installation and you’re done.
After this step you are done with the cluster. You do not need to configure the steps above for the other SQL server.
INSTALLATION OF SQL SERVER
Now we are ready to install SQL Server.
Go to VMSQL01. This is your master cluster. Run the wizard and select Installation -> New SQL Server failover cluster installation.
Simply follow the wizard. When it comes to the Features selection, select the features you want to install. NOTE: You can NOT use the cluster disk as the Shared Feature Directory. You have to select a local disk to the server (eg. C:\).
In the Instance Configuration section the wizard will ask you for SQL Server Network Name. This will be the server name you will use in your SharePoint/application connection string! Please remember that this is a cluster therefore you will not use a particular server name but rather this network name. In your connection string it will be something like Data Source=CLUSTER\INSTANCENAME.
On Cluster Disk Selection nominate the 2 disks you’ve shared previously.
On Cluster Network Configuration, specify an IP Address for the SQL cluster node. The IP address is a new IP address and NOT VMSQL01’s nor VMSQL02’s.
Then you can finish of the rest of the installation. Set DATA and LOG directory as per your added cluster drives.
Once the main cluster node SQL install is finished, go to the second node VMSQL02.
Run the wizard but this time select Installation -> Add node to a SQL Server failover cluster.
Simply follow the wizard. When you arrive at Cluster Node Configuration, select the instance you created earlier. It should automatically detect the master cluster.
Then specify the service accounts and finish off the installation.
USING SQL SERVER CLUSTER
So finally we are at the very last step of using the SQL Cluster! YIPPEE!! As mentioned earlier, simply using CLUSTERNAME\INSTANCENAME rather than a specific server name.
Hope this helps,
Tommy
, - Posted by Tommy Segoro
INTRODUCTION
I have just done a site migration from SharePoint 2010 to SharePoint 2013. One of the features the SP 2010 site was using was Managed Metadata field. Obviously, when you migrate a SharePoint site to a completely different farm (not to mention different SharePoint version), you have to also migrate the Managed Metadata database otherwise search or other custom functionalities that depend on the Managed Metadata will not work properly.
The main challenge is to ensure how existing content still points to the correct term store and term sets in the new farm especially when the site is referencing using the GUIDs instead of the individual “word/term”. Re-creating the term store and term set will not work either because the GUID will be different.
Therefore, I would like to share through this article the process and steps I took to complete the task. I hope that this helps those who want to do the same.
THE TOOLS YOU NEED
– SPMMDNavigator from CodePlex – http://spmmdnavigator.codeplex.com/releases/view/95827
THE STEPS
EXPORTING
First, on the SOURCE server, run the SPMMDNavigator tool. You will see the following screen:

What the tool allows you to do is to view the Managed Metadata Service of the current farm (which in this case is the SOURCE server). What you want to do next is to export the metadata. Click on the Term Group (which I covered with red mark above due to privacy) then click on EXPORT tab.
Then select “Use Custom Xml Format (includes Guids, Synonyms)” and click Export. Specify the filename (XML file) and you are done.
CLEANING UP
On the exported XML file you will notice that the tool also exports synonyms. The tool however doesn’t work properly upon importing synonyms. Therefore, these needs to be cleaned up first and you have to re-enter the synonyms manually.
I may be wrong, the tool may do it correctly but it never worked for me. So anyway, if it doesn’t work for you, open the XML file and do the following:
Fine the following line(s):
<term name=”Computers” id=”c4f1264a-f6c6-4abd-acb8-19e8d3808858″ description=”” isavailfortagging=”true” reuse=”false” reusebranch=”false”>
<label name=”PC” />
</term>
Simply delete it so your XML should look like:
<term name=”Computers” id=”c4f1264a-f6c6-4abd-acb8-19e8d3808858″ description=”” isavailfortagging=”true” reuse=”false” reusebranch=”false”>
</term>
Do it for every synonym you can find in your file.
IMPORTING
Then, go to DESTINATION farm/server and in Managed Metadata Service create a new term group with exactly the same name as the source server. For example, if the term group you are exporting is called “My Company” then on the destination server you have to use the exactly the same name.
After that, run SPMMDNavigator on DESTINATION server. You will see exactly the same interface except this time you want to import instead.
So, as above, click on the term group that you have created (eg. “My Company”) then click on IMPORT. Select the XML file you’ve cleaned up and you’re done!
The tool will import all the terms and assign the exactly the same GUID as your SOURCE server which is AWESOME! 🙂
Go to your DESTINATION Managed Metadata Service and you should be able to find all term sets imported successfully under “My Company” group.
RELINKING
The very final step is to re-link your SharePoint site with the new term set you’ve imported. To do this, go to your restored SharePoint site on DESTINATION and go to Site Columns and find your Managed Metadata field.
You will notice that the link is missing. Simply select the imported term set and click OK. You’re done!

Hope this helps,
Tommy
We provides you the best Services in our themes.
Click on the link below to see a full list of clients which we have developed solutions and provided consultancy for.
We are solution-centered and not application-centered.
Being creative and having fun and yet still delivering a fantastic service is the center of our values.
TFS Consulting Services guarantees delivery that is within budget and deadline or you engage us for free.

Implementing IT solution does not have to be difficult. TFS Consulting Services has a lot of resources on planning and methodologies that will ensure successful delivery of your IT solution. TFS Consulting Services has been around in the web industry for more than 10 years and has experienced all the successes and failures of various type of IT deployment.

Do you need a technical resource? TFS Consulting Services can also provide you with technical resource for developing ASP.NET (C# and VB.NET), SharePoint (2003, 2007, 2010, 2013) and MS CRM applications. Our resource is an Microsoft Certified Personnel (MVP) and Microsoft Certified Technology Specialist (MCTS) in all ASP.NET, SharePoint and CRM.

Make sure your IT implementation is robust and scalable. TFS Consulting Services can provide consulting and advice on industry’s best practice on various web-related areas such as website security, design and usability, application-specific (such as SharePoint)’s best practice, Search Engine Optimisation (SEO), coding standards and many others.

Finally TFS Consulting Services provides you with solution development service. We mainly work with Microsoft technologies (ie. .NET and SQL Server), however we are also capable of developing with PHP and MySQL. If you ever need any business process automation, integration and solution development work, we are the trusted expert you should go to.
For more detailed service offerings please visit our Solutions page.
Tommy Segoro
tommy@tfsconsulting.com.au
+61 404 457 754
© TFS Consulting Services 2026. All rights reserved.