, - Posted by Tommy Segoro
INTRODUCTION
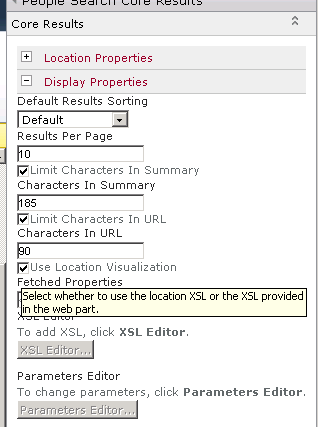
I just upgraded my SharePoint 2010 site to SharePoint 2013. One of the functionalities that my SharePoint 2010 site had was People search. The restore to SP 2013 was successful. However, when I tried to do People search the Core Search Results web-part displays the following error message:
Property does not exist or is used in a manner inconsistent with schema settings
I have used both site collection backup/restore and database backup/restore method.
RESOLUTION
The fix, edit the Core Search Results web-part and within the Display Properties category and tick the Use Location Visualization.
Hope this helps,
Tommy
, - Posted by Tommy Segoro
INTRODUCTION
I have just installed SharePoint 2013 and I’m now in the process of migrating sites.
One of the sites has FBA Authentication setup with custom login page. In the custom login page I use SPClaimsUtility.AuthenticateFormsUser to authenticate the user.
The site was restored OK in SP 2013 except when I tried to login using the custom login page I get the following error:
==
Exception information:
Exception type: FileNotFoundException
Exception message: Could not load file or assembly ‘Microsoft.SharePoint.IdentityModel, Version=14.0.0.0, Culture=neutral, PublicKeyToken=71e9bce111e9429c’ or one of its dependencies. The system cannot find the file specified.
at RDC.Branding.Layouts.RDC.Branding.LoginPage.Login_Click(Object sender, EventArgs e)
at System.Web.UI.WebControls.Button.RaisePostBackEvent(String eventArgument)
at System.Web.UI.Page.ProcessRequestMain(Boolean includeStagesBeforeAsyncPoint, Boolean includeStagesAfterAsyncPoint)
==
RESOLUTION
The resolution to this issue was missing a dependent assembly. So open your SP site’s web.config and add the following lines within <assemblyBinding> tag:
<dependentAssembly>
<assemblyIdentity name=”Microsoft.SharePoint.IdentityModel” publicKeyToken=”71e9bce111e9429c” culture=”neutral” />
<bindingRedirect oldVersion=”14.0.0.0″ newVersion=”15.0.0.0″ />
</dependentAssembly>
Hope this helps,
Tommy
, - Posted by Tommy Segoro
INTRODUCTION
In Visual Studio 2010 you can create a Visual Web Part (ie. web part that renders ASCX file). In VS 2010 when you create a Visual Web Part, VS 2010 automatically creates a module that contains the following files:
– Web part class (UserProfileListing.cs below)
– ASCX and code behind
– Elements.xml file
– .webpart file
See below for example:

In Visual Studio 2012 however, the following files don’t exist:
– Web part class
See below:
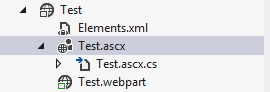
Rather, the .webpart file references the ASCX code-behind class name directly. And if you open the package file, the ASCX is also not included meaning that your ASCX will not be deployed as part of the WSP file. See below:

This is not working properly for me.
WORKAROUND
The workaround is:
– Create a separate user control that lives in /_CONTROLTEMPLATES.
– Create a class that references Microsoft.SharePoint.WebPartPages.WebPart
– Point your .webpart to the custom class you just created, such as below:
<?xml version=”1.0″ encoding=”utf-8″?>
<webParts>
<webPart xmlns=”http://schemas.microsoft.com/WebPart/v3″>
<metaData>
<type name=”XXX.SP.Quickpoll.Quickpoll.Quickpoll, $SharePoint.Project.AssemblyFullName$” />
<importErrorMessage>$Resources:core,ImportErrorMessage;</importErrorMessage>
</metaData>
<data>
<properties>
<property name=”Title” type=”string”>Quickpoll</property>
<property name=”Description” type=”string”>The Quickpoll web part.</property>
</properties>
</data>
</webPart>
</webParts>
– Then finally in your custom web part class load the ASCX file:
protected override void CreateChildControls()
{
ControlTemplates.XXX.SP.Quickpoll.Quickpoll control = Page.LoadControl(“~/_CONTROLTEMPLATES/XXX.SP.Quickpoll/Quickpoll.ascx”) as ControlTemplates.XXX.SP.Quickpoll.Quickpoll;
Controls.Add(control);
}
The easiest way is to refer to your Visual Studio 2010 Visual Web Part module template.
Hope this helps,
Tommy
, - Posted by Tommy Segoro
INTRODUCTION
I was so looking forward when SharePoint 2013 RTM and Visual Studio 2012 RTM were finally out. I was so eager to play around with them and start creating SharePoint 2013 solutions.
The install was finally finished and I opened Visual Studio 2012. My first impression was – as with anything new – it is a bit confusing. The Visual Studio 2010 has more colour variations than the 2012. The 2012 looks more like Microsoft Blend which is just either plain white or black. All the icons and buttons are coloured the same (hence why the confusion). But anyway, that’s not my main point. I can still live with the UI.
The biggest deal breaker for me was the fact that SharePoint 2013 project templates were not available out-of-the-box! There were the SharePoint 2010 project templates but not the 2012. And when I tried to create a project using the 2010 template it says that, “SharePoint Server is not installed”.
SOLUTION
You need to install the Microsoft Office Developer Tools for Visual Studio 2012. Download it from the following URL:
http://msdn.microsoft.com/en-us/office/apps/fp123627.aspx
Or if you want a direct link:
If you run Visual Studio 2012 Release Candidate, you need to download a different tool:
http://go.microsoft.com/fwlink/?LinkID=257068
Hope this helps,
Tommy
, - Posted by Tommy Segoro
INTRODUCTION
I have been developing InfoPath with SharePoint for years and in this article I would like to share some tips that I’ve learnt throughout these years which I believe have helped me and I know will help you, too.
InfoPath is such a great product. And when we are talking about electronic forms, InfoPath is definitely my product of choice. Not only can it build forms pretty rapidly, it also has many built-in functionalities such as connecting to external data sources, assigning field validations and many others. The only complication that I often experience though is deployment to SharePoint.
So first of all I would like to discuss about the type of InfoPath development that you can do with SharePoint.
USING MANAGE FORM TEMPLATES IN CENTRAL ADMIN
The first approach is by deploying your form as a managed form template in Central Admin. If you open Central Admin then go to General Application Settings -> Manage form templates, you can upload your XSN (ie. InfoPath Form Template) in there. You can then activate the XSN to a particular site collection. What this will do is creating a custom site content type in your site collection which you can then attach to a document/form library.
The site content type is automatically associated with your XSN. Therefore, if you try to create a new document using the content type, InfoPath will automatically trigger use your form template.
The benefits:
– You can use ALL InfoPath features including repeating tables, etc.
– The generate Site Content Type can be attached to any document library within the site collection.
The disadvantages:
– Upgrading the form template can be time consuming as you have to re-upload the updated XSN through Central Admin.
– If you need to make InfoPath fields available in your list, you have to manually promote them.
– There is no direct linking between your form template and the list column meaning that if you create a list column, you can’t directly reference it in your template.
– If you remove a promoted field from the template, you WILL get an error if you try to open submitted forms that were submitted using the old template (so be careful!).
– Migration to another site collection with different URL can be challenging as you need to extract the XSN, modify the manifest.xsf and update the URL then re-publish the form template.
The best practice:
– For all data connections ensure you convert them to UDCX in the site collection then Approve them otherwise you may get an error when the form tries to access these connections.
– Form template has to be signed with a certificate before you can publish it in Central Admin. When you sign a certificate do NOT use the InfoPath tool but rather go to Start -> All Programs -> Microsoft Office -> Microsoft Office 2010 Tools -> Digital Certificate for VBA Projects. This tool will generate a 6-year expiry certificate while the InfoPath only generates 1-month expiry.
– When assigning a certificate select DOMAIN instead of FULL TRUST. With FULL TRUST user will be prompted for an invalid certificate if the certificate is self-generated, while the DOMAIN will not.
– Hide the SUBMIT button on top-left-hand-corner and rather use a custom BIG SUBMIT button at the bottom of the form.
– If you create a custom SUBMIT button make sure you call Submit action first before Close This Form. The Submit action will trigger field validations.
USING CUSTOMIZE FORM BUTTON IN CUSTOM LIST
Another way of developing InfoPath form with SharePoint is through the CUSTOMIZE FORM button. The button only appears on Custom List. Try it…create a list using Custom List template then on the ribbon, click on List and you will notice a Customize Form button. If you click it, InfoPath will open and you can then modify the VIEW ITEM, EDIT ITEM and ADD ITEM page of that list using InfoPath.
The benefits:
– You have direct access to the list columns.
– All data connections are relative to the site collection, so you don’t have to worry about publishing your data connections into UDCX files.
– Migration is very simple. Simply save the list as a template then restore it.
– Form is auto-trusted so you don’t have to assign a certificate.
The disadvantages:
– Limited feature. Features such as repeating tables are not available.
– Form template is attached only to that particular list and the list of available fields are dictated by the list columns.
The best practice:
– Do not convert any of the data connections into UDCX or you will have problem with migration.
– Do not turn on SUBMIT feature as the form template will be opened within the VIEW ITEM, EDIT ITEM and ADD ITEM context (which means the SAVE button located on the ribbon is what’s used).
WHICH OPTIONS TO USE?
It all depends on the needs. I personally prefer the first approach (ie. the full-blown managed form template approach) but it is obviously a bit more complicated than the second approach.
GENERAL BEST PRACTICE
– Form needs to be idiot-proof. Meaning, user should never get any error message or they will be very reluctant in using it.
– PRINT button needs to be made available in Form Services page (FormServer.aspx) because users will be looking for it. By default no PRINT button is available but instead Print Preview. I’ve written a script on this blog post to display a custom Print button.
– If you ever do a username comparison from either People Picker or User Profile Service (/_layouts/_vti_bin/userprofileservice.asmx), make sure that you UPPERCASE or LOWERCASE the usernames prior to comparing! Why? Because the usernames returned by People Picker, User Profile Service and username() method may be in different alphabet casing, and when this is the case, the comparison will fail. For example, sometimes People Picker may return TFSCONSULTING\tommy.segoro but the User Profile Service may return tfsconsulting\Tommy.Segoro and when you are comparing these two (either using EQUALS or CONTAINS), even though the usernames are exactly the same, if they are on different casing, the condition will return false.
– If you ever need to build a custom approval workflow, do NOT use the Task List auto-email notification. Turn that off and rather create a Custom Code task in your Visual Studio workflow to send a custom email. Why? The OOTB Task List notification email contains a direct link to the submitted form except it will automatically open the InfoPath client if user has InfoPath client on their machine (even though you have set in the library settings to open in the browser). And not just that, the OOTB Task List will send a notification email every time the task status is changed. The problem is, when the task is either approved or rejected, the email you’ll get will always say, “Task is completed” instead of “approved” or “rejected” respectively. So from the user point-of-view it is very confusing.
We provides you the best Services in our themes.
Click on the link below to see a full list of clients which we have developed solutions and provided consultancy for.
We are solution-centered and not application-centered.
Being creative and having fun and yet still delivering a fantastic service is the center of our values.
TFS Consulting Services guarantees delivery that is within budget and deadline or you engage us for free.

Implementing IT solution does not have to be difficult. TFS Consulting Services has a lot of resources on planning and methodologies that will ensure successful delivery of your IT solution. TFS Consulting Services has been around in the web industry for more than 10 years and has experienced all the successes and failures of various type of IT deployment.

Do you need a technical resource? TFS Consulting Services can also provide you with technical resource for developing ASP.NET (C# and VB.NET), SharePoint (2003, 2007, 2010, 2013) and MS CRM applications. Our resource is an Microsoft Certified Personnel (MVP) and Microsoft Certified Technology Specialist (MCTS) in all ASP.NET, SharePoint and CRM.

Make sure your IT implementation is robust and scalable. TFS Consulting Services can provide consulting and advice on industry’s best practice on various web-related areas such as website security, design and usability, application-specific (such as SharePoint)’s best practice, Search Engine Optimisation (SEO), coding standards and many others.

Finally TFS Consulting Services provides you with solution development service. We mainly work with Microsoft technologies (ie. .NET and SQL Server), however we are also capable of developing with PHP and MySQL. If you ever need any business process automation, integration and solution development work, we are the trusted expert you should go to.
For more detailed service offerings please visit our Solutions page.
Tommy Segoro
tommy@tfsconsulting.com.au
+61 404 457 754
© TFS Consulting Services 2026. All rights reserved.