INTRODUCTION
With Sitecore you can choose the search technology to use: Lucene or SOLR. As per Sitecore’s recommendation, SOLR is preferred. See below article for more details:
This article details on how to install and configure SOLR, creating custom index and running query to the SOLR index using C#.
INSTALLING SOLR
To install SOLR:
1. Download SOLR from https://bitnami.com/stack/solr. This article is using version 6.4.1.
2. Run the EXE
3. Specify the installation folder

4. Click Next then specify admin username and password

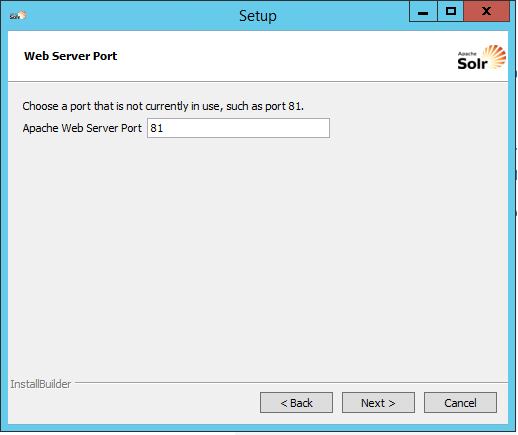
5. Specify the Apache web server port. I leave it at 81 unless there is another application running on this port.
6. Specify the SSL Port. I set it to 8143 just so it’s easy to remember as the first two digits resembles the HTTP port above.

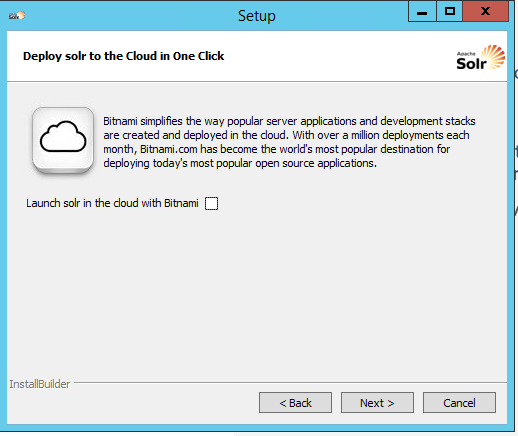
7. Untick the “running solr in cloud with Bitnami”
8. Then let it install.
9. Once finished, you’ll be able to check if SOLR has been installed successfully in your machine by going to http://[machinename]:[selectedportabove]. In my case it is http://localhost:81. It will ask you to input your username and password.
CONFIGURING SOLR
Before we use SOLR with Sitecore we need to first configure it and create indexes. These indexes act like a “database” that will then be populated by Sitecore when we run Search Index in Sitecore. To configure SOLR:
1. Go to C:\Bitnami\solr-6.4.1-0\apache-solr\solr\configsets.
2. Make a copy of basic_configs folder and rename it to sitecore_configs.

3. Go to sitecore_configs > conf folder and check if you have Schema.xml file. If you don’t, make a copy of managed-schema file within the folder then rename the copy to Schema.xml.
4. Edit solrconfig.xml and add the following before the closing </config> tag down at the very bottom of the file:
<schemaFactory class="ClassicIndexSchemaFactory" />

5. Open Schema.xml then:
– Enclose all <field> and <dynamicField> elements in a <fields> tag.
– Enclose all <fieldType> elements in a <types> tag.
What it means is, in Schema.xml you will see a lot of these:
<field name=”id” type=”string” …… />
They are not under any parent tag. What you need to do is to enclose them with <fields> tag for all <field> and <dynamicField>. So instead of:
<field name=”id” type=”string” …… />
<field name=”_version” type=”string” …… />
<field name=”_root” type=”string” …… />
<dynamicField name=”id” type=”string” …… />
.
.
.
it will become:
<fields>
<field name=”id” type=”string” …… />
<field name=”_version” type=”string” …… />
<field name=”_root” type=”string” …… />
<dynamicField name=”id” type=”string” …… />
.
.
.
</fields>
To make it easier, I’ve made an updated Schema.xml which you can download.
Download fixed original Schema.xml. Rename to Schema.xml once you’ve downloaded.
6. Log into your Sitecore instance.
7. Navigate to Sitecore Control Panel.
8. In the Control Panel, click Generate the Solr Schema.xml file link in Index section.
9. Then put in the following:
Source file:
C:\Bitnami\solr-6.4.1-0\apache-solr\server\solr\configsets\sitecore_configs\conf\schema.xml
Destination file:
C:\Bitnami\solr-6.4.1-0\apache-solr\server\solr\configsets\sitecore_configs\conf\schemanew.xml
10. Sitecore will then create a new SchemaNew.xml file.
11. Rename your old Schema.xml to something like Schema.xml.old, then rename SchemaNew.xml to Schema.xml
12. Open the new Schema.xml then add the following inside <fieldTypes>:
<fieldType name="pint" class="solr.TrieIntField" docValues="true" precisionStep="0" positionIncrementGap="0" />
CREATING SOLR INDEXES
Next we are ready to create SOLR Indexes. To do so:
1. Copy your sitecore_configs folder to C:\Bitnami\solr-6.4.1-0\apache-solr\server\solr.
2. Rename it to sitecore_web_index.

3. Repeat 1 & 2 and rename to the following folders:
sitecore_web_index
sitecore_master_index
sitecore_core_index
sitecore_analytics_index
social_messages_web
social_messages_master
sitecore_marketing_asset_index_master
sitecore_marketing_asset_index_web
sitecore_testing_index
sitecore_suggested_test_index
sitecore_fxm_master_index
sitecore_fxm_web_index
sitecore_list_index
sitecore_marketingdefinitions_master
sitecore_marketingdefinitions_web

4. Next, go to SOLR admin page http://localhost:81/solr then click Core Admin link. You will then need to create the index for each one. SOLR will do the linking for you:

Repeat for each of the index folder you created previously.
sitecore_web_index
sitecore_master_index
sitecore_core_index
sitecore_analytics_index
social_messages_web
social_messages_master
sitecore_marketing_asset_index_master
sitecore_marketing_asset_index_web
sitecore_testing_index
sitecore_suggested_test_index
sitecore_fxm_master_index
sitecore_fxm_web_index
sitecore_list_index
sitecore_marketingdefinitions_master
sitecore_marketingdefinitions_web

CONFIGURING SITECORE TO WORK WITH SOLR
Finally, it’s time to configure Sitecore to work with SOLR. To do so:
NOTE: Easiest way is to use Windows Find inside the “App_Config” folder and just type in Lucene. It will bring you ALL Lucene related config files.
1. Disable Lucene by navigating to the website Include folder: \Website\App_Config\Include\ and disable the following Lucene configuration files by adding .disabled to the file name extension:
Sitecore.ContentSearch.Lucene.DefaultIndexConfiguration.config
Sitecore.ContentSearch.Lucene.DefaultIndexConfiguration.Xdb.config
Sitecore.ContentSearch.Lucene.Index.Analytics.config
Sitecore.ContentSearch.Lucene.Index.Core.config
Sitecore.ContentSearch.Lucene.Index.Master.config
Sitecore.ContentSearch.Lucene.Index.Web.config
Sitecore.ContentSearch.Lucene.Indexes.Sharded.Core.config
Sitecore.ContentSearch.Lucene.Indexes.Sharded.Master.config
Sitecore.ContentSearch.Lucene.Indexes.Sharded.Web.config
Sitecore.Marketing.Definitions.MarketingAssets.Repositories.Lucene.Index.Master.config
Sitecore.Marketing.Definitions.MarketingAssets.Repositories.Lucene.Index.Web.config
Sitecore.Marketing.Definitions.MarketingAssets.Repositories.Lucene.IndexConfiguration.config
Sitecore.Marketing.Lucene.Index.Master.config
Sitecore.Marketing.Lucene.Index.Web.config
Sitecore.Marketing.Lucene.IndexConfiguration.config
Sitecore.Speak.ContentSearch.Lucene.config
2. Navigate to \Website\App_Config\Include\FXM and disable the following Lucene configuration files by adding .disabled to the file name extension:
Sitecore.FXM.Lucene.DomainsSearch.DefaultIndexConfiguration.config
Sitecore.FXM.Lucene.DomainsSearch.Index.Master.config
Sitecore.FXM.Lucene.DomainsSearch.Index.Web.config
3. Navigate to \Website\App_Config\Include\ListManagement and disable the following Lucene configuration files by adding .disabled to the file name extension:
Sitecore.ListManagement.Lucene.Index.List.config
Sitecore.ListManagement.Lucene.IndexConfiguration.config
4. Navigate to \Website\App_Config\Include\Social and disable the following Lucene configuration files by adding .disabled to the file name extension:
Sitecore.Social.Lucene.Index.Analytics.Facebook.config
Sitecore.Social.Lucene.Index.Master.config
Sitecore.Social.Lucene.Index.Web.config
Sitecore.Social.Lucene.IndexConfiguration.config
5. Navigate to \Website\App_Config\Include\ContentTesting and disable the following Lucene configuration files by adding .disabled to the file name extension:
Sitecore.ContentTesting.Lucene.IndexConfiguration.config
6. Next, we need to enable SOLR Config files. Enable the Sitecore.ContentSearch.Solr.*.config files by removing .example/.disabled from the file name. Configuration file extension should be .config.
Sitecore.ContentSearch.Solr.DefaultIndexConfiguration.config
Sitecore.ContentSearch.Solr.DefaultIndexConfiguration.Xdb.config
Sitecore.ContentSearch.Solr.Index.Analytics.config
Sitecore.ContentSearch.Solr.Index.Core.config
Sitecore.ContentSearch.Solr.Index.Master.config
Sitecore.ContentSearch.Solr.Index.Web.config
Sitecore.Marketing.Definitions.MarketingAssets.Repositories.Solr.Index.Master.config
Sitecore.Marketing.Definitions.MarketingAssets.Repositories.Solr.Index.Web.config
Sitecore.Marketing.Definitions.MarketingAssets.Repositories.Solr.IndexConfiguration.config
Sitecore.Marketing.Solr.Index.Master.config
Sitecore.Marketing.Solr.Index.Web.config
Sitecore.Marketing.Solr.IndexConfiguration.config
Sitecore.Speak.ContentSearch.Solr.config
7. Navigate to \Website\App_Config\Include\FXM and enable below configuration files by removing .example/.disabled from the file name:
Sitecore.FXM.Solr.DomainsSearch.DefaultIndexConfiguration.config
Sitecore.FXM.Solr.DomainsSearch.Index.Master.config
Sitecore.FXM.Solr.DomainsSearch.Index.Web.config
8. Navigate to \Website\App_Config\Include\ListManagement and enable below configuration files by removing .example/.disabled from the file name:
Sitecore.ListManagement.Solr.Index.List.config
Sitecore.ListManagement.Solr.IndexConfiguration.config
9. Navigate to \Website\App_Config\Include\Social and and enable below configuration files by removing .example/.disabled from the file name:
Sitecore.Social.Solr.Index.Master.config
Sitecore.Social.Solr.Index.Web.config
Sitecore.Social.Solr.IndexConfiguration.config
10. Navigate to \Website\App_Config\Include\ContentTesting and and enable below configuration files by removing .example/.disabled from the file name:
Sitecore.ContentTesting.Solr.IndexConfiguration.config
11. Open Sitecore.ContentSearch.Solr.DefaultIndexConfiguration.config and ensure that the SOLR public URL can be accessed through the browser. Look for ContentSearch.Solr.ServiceBaseAddress.
When you visit the URL it should log you in straight away without asking you to authenticate.
12. Once that works, go to Sitecore backend > Control Panel and click on Indexing Manager to rebuild the index. It should complete successfully.
13. Once completed, go back to your SOLR Web interface and check that each index has been updated. It should display the number of documents/items indexed.
CREATING CUSTOM INDEX
To create custom Index:
1. Go to your Website/App_Config/Include folder.
2. Create a copy of Sitecore.ContentSearch.Solr.Index.Web.config and rename it to Sitecore.ContentSearch.Solr.Index.MyIndex.config
3. Open Sitecore.ContentSearch.Solr.Index.MyIndex.config and change settings as necessary. Mainly:
id=”sitecore_myindex” and
<Root>/sitecore/content/mywebsite</Root>
4. You also need to create an index in SOLR, back to:
C:\Bitnami\solr-6.4.1-0\apache-solr\server\solr\configsets\
And copy sitecore_configs folder to C:\Bitnami\solr-6.4.1-0\apache-solr\server\solr\
Then rename to sitecore_myindex (has to be the same as the “id” field above)
5. Then in SOLR user interface create core
6. In Sitecore backend rebuild index. That’s it.
C# QUERYING SITECORE INDEX
To query index using C#:
using System;
using System.Collections.Generic;
using System.Linq;
using System.Web;
using Sitecore.ContentSearch;
using Sitecore.ContentSearch.SearchTypes;
namespace MyIndex
{
public class SitecoreIndexSearchQueryController
{
private const int MAX_BODY_DESCRIPTION = 300;
/// <summary>
/// Searching Sitecore index.
/// </summary>
/// <param name=”keyword”></param>
/// <returns></returns>
public SearchEntity GetSearchResults(string keyword)
{
SearchEntity search = null;
var index = ContentSearchManager.GetIndex(“sitecore_myindex”);
using (var context = index.CreateSearchContext())
{
var results =
context.GetQueryable<SearchResultItem>()
.Where(
resultItem =>
resultItem.Name.Contains(keyword) ||
resultItem.Content.Contains(keyword));
if (results.Count() > 0)
{
search = new SearchEntity();
search.DisplayPhrase = keyword;
search.SearchPhrase = keyword;
foreach (var result in results)
{
Repositories.Entities.SearchResultEntity searchResult = new SearchResultEntity();
var item = result.GetItem();
if (item != null && item.Template != null && item.Template.InnerItem != null && item.Template.InnerItem.Paths != null && !String.IsNullOrEmpty(item.Template.InnerItem.Paths.ContentPath))
{
if (item.Template.InnerItem.Paths.ContentPath.ToLower().Contains(“/sitecore/templates/relationships australia/wa”))
{
searchResult.Title = item[“Title”];
string content = Util.FrameworkHelper.StripHTML(item[“Content”]); // get page content and strip HTML tags
if (content.Length >= MAX_BODY_DESCRIPTION)
searchResult.Blurb = content.Substring(0, MAX_BODY_DESCRIPTION); // truncate content to first 300 characters
else
searchResult.Blurb = content; // truncate content to first 300 characters
searchResult.Url = Sitecore.Links.LinkManager.GetItemUrl(item);
search.Results.Add(searchResult);
}
}
}
}
}
return search;
}
}
}
Hope this helps,
Tommy
We provides you the best Services in our themes.
Click on the link below to see a full list of clients which we have developed solutions and provided consultancy for.
We are solution-centered and not application-centered.
Being creative and having fun and yet still delivering a fantastic service is the center of our values.
TFS Consulting Services guarantees delivery that is within budget and deadline or you engage us for free.

Implementing IT solution does not have to be difficult. TFS Consulting Services has a lot of resources on planning and methodologies that will ensure successful delivery of your IT solution. TFS Consulting Services has been around in the web industry for more than 10 years and has experienced all the successes and failures of various type of IT deployment.

Do you need a technical resource? TFS Consulting Services can also provide you with technical resource for developing ASP.NET (C# and VB.NET), SharePoint (2003, 2007, 2010, 2013) and MS CRM applications. Our resource is an Microsoft Certified Personnel (MVP) and Microsoft Certified Technology Specialist (MCTS) in all ASP.NET, SharePoint and CRM.

Make sure your IT implementation is robust and scalable. TFS Consulting Services can provide consulting and advice on industry’s best practice on various web-related areas such as website security, design and usability, application-specific (such as SharePoint)’s best practice, Search Engine Optimisation (SEO), coding standards and many others.

Finally TFS Consulting Services provides you with solution development service. We mainly work with Microsoft technologies (ie. .NET and SQL Server), however we are also capable of developing with PHP and MySQL. If you ever need any business process automation, integration and solution development work, we are the trusted expert you should go to.
For more detailed service offerings please visit our Solutions page.
Tommy Segoro
tommy@tfsconsulting.com.au
+61 404 457 754
© TFS Consulting Services 2026. All rights reserved.